久しぶりにLongan Nano

久しぶりにLongan Nanoを触ります。

LinuxをLinuxMint18.3に更新したので、再度Platform IOの環境から構築し直します。手順は、前回のこれこれと同じ。

Lチカまで確認できたら、GitHubにあるサンプルプログラムを動かしてみます。まずは、ZIPでダウンロードしてきて展開します。

Platform IOで新規プロジェクトを作成します。プロジェクト作成時には、ボード名は「Sipeed Longan Nano」を選択します。(Sipeed Longan Nano Lite)

“久しぶりにLongan Nano” の続きを読む

特定の端末を探すのを省力化

TTGO T-Cameraで監視している3Dプリンタですが、DHCPでアドレスを振っているのでたまにIPアドレスが変わってしまうことがあります。

そこで、MACアドレスを検索してブラウザで開くbashスクリプトを書いてみました。(超手抜きです)

#!/bin/bash
rt=`arp -a | grep "xx:xx:xx:xx:xx:xx"`
if [[ ${rt} =~ ([0-9]+\.[0-9]+\.[0-9]+\.[0-9]+) ]]; then
  ip=${BASH_REMATCH[0]}
  echo ${ip}
  /usr/bin/google-chrome-stable --incognito ${ip}
fi

2行目のgrepのところにあるのがMACアドレスです。arpテーブルから当該MACアドレスを探して、そのIPアドレスをGoogle chromeのシークレットモードで開くという単純なものです。

小型PCのSSDをリムーバブルに改造

あまり使用していないPCがあるのですが、これを実験用にするため、SSDをリムーバブルに改造してみました。

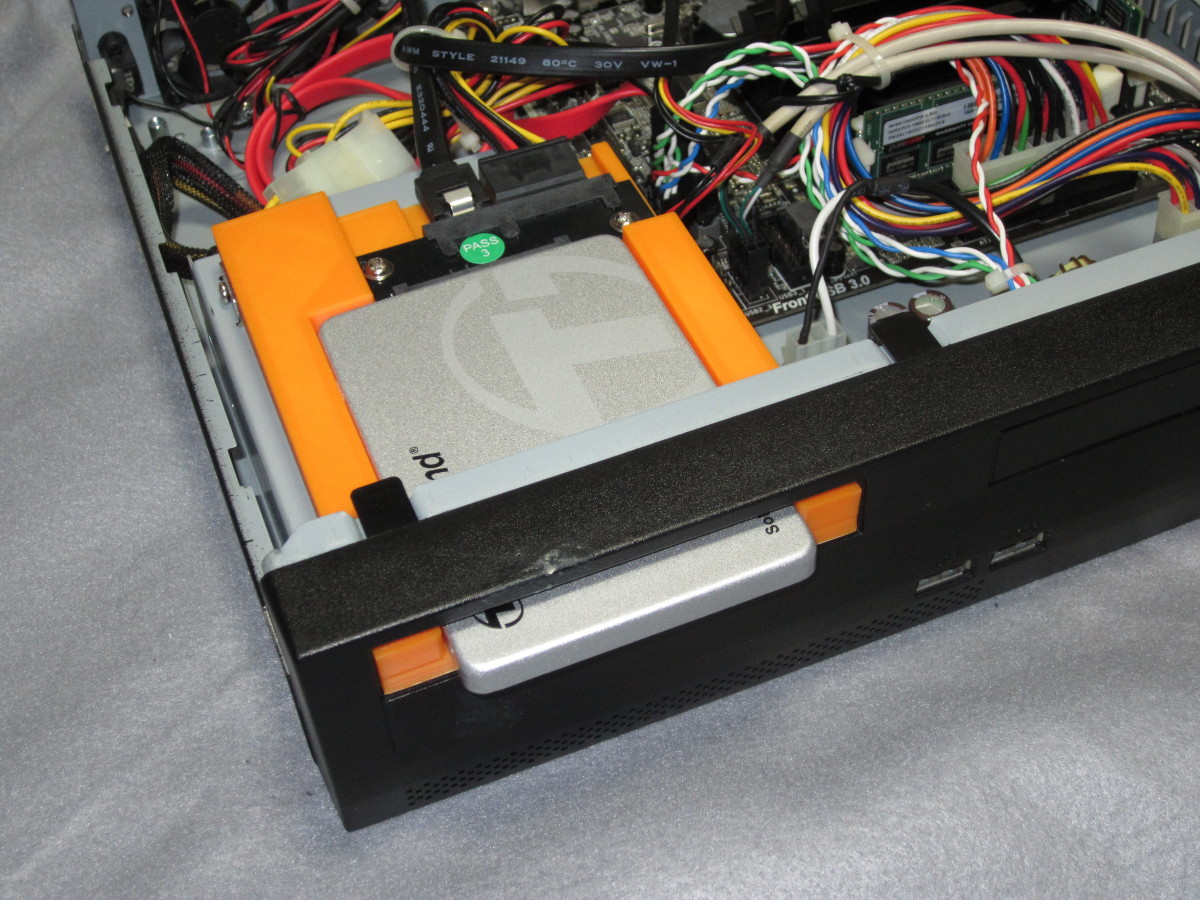
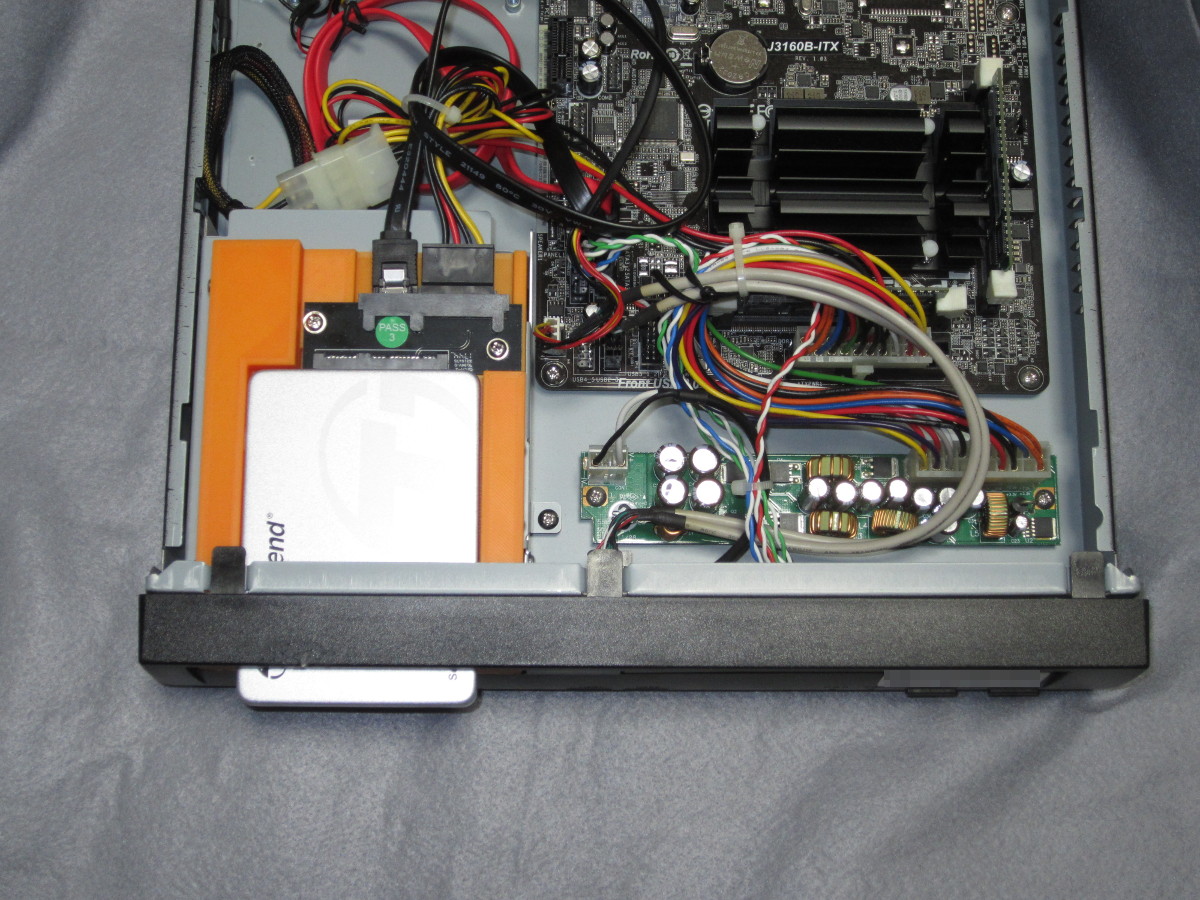
改造後の状態はこんな感じです。

もともとのスリムFDD取付用の場所にマウンタを作って付けてみました。基板は使わなくなったセンチュリーの「裸族のインナー(CRIN2535)」の基板だけを流用してみました。7mm厚のSSDしか使えませんが、SSDも安くなっているので問題ありません。

もう1台、同じケースのPCがあるのですが、こちらも今マウンタを出力中です。これで安いSSDを付けて実験マシンにしたいと思います。

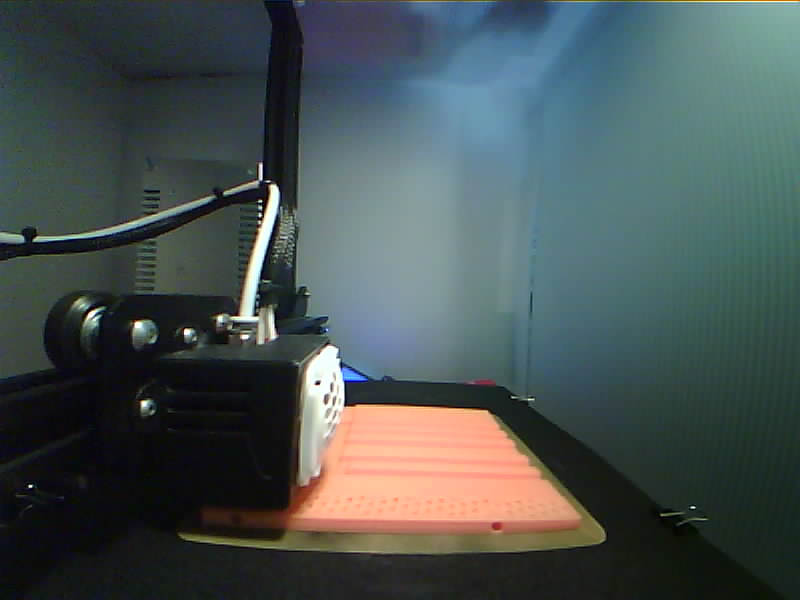
写真ではわかりませんが、今回はABSで出力したのですが、やはり反りが結構きついです。自分の使い方だと寸法を十分に検討してPLAで出力するほうが楽なようです。

Longan NanoでLチカ

引き続き、Longan NanoでLチカにトライしてみます。
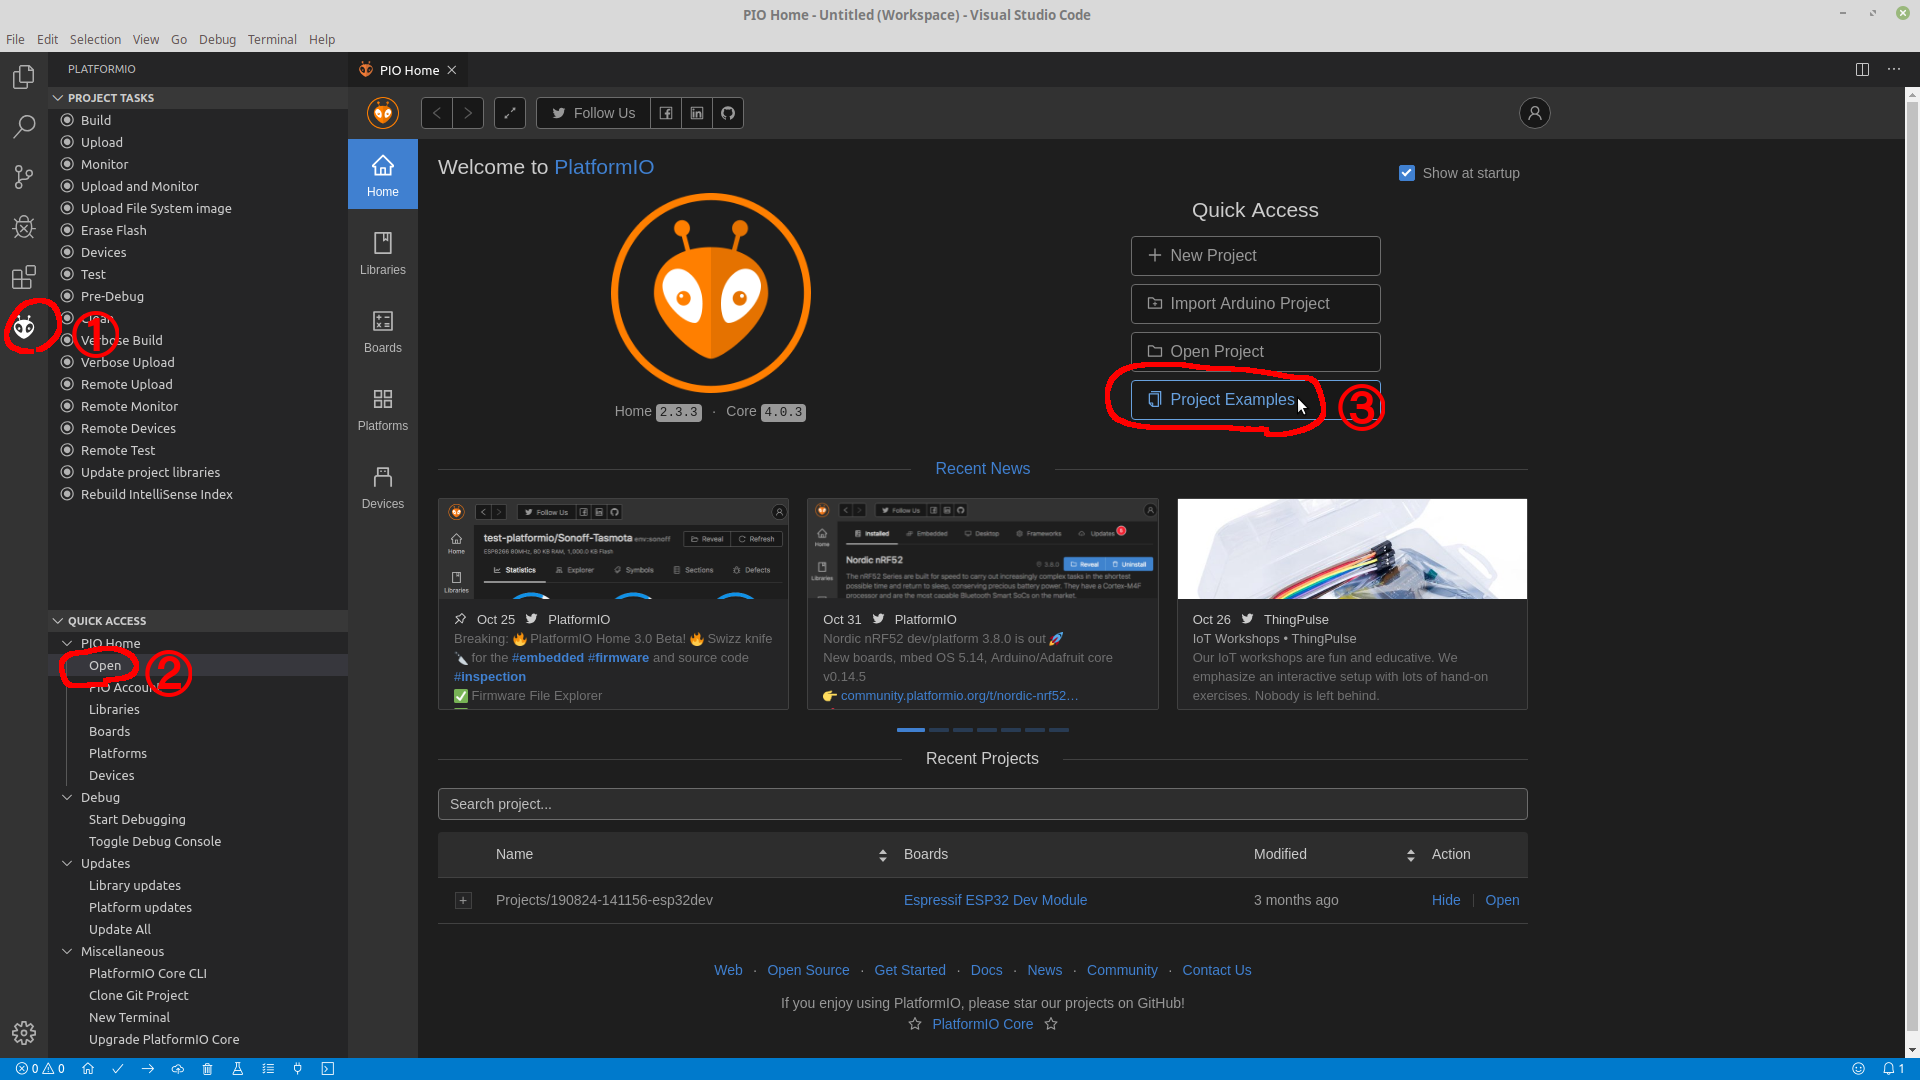
PlatformIOのロゴをクリック(①)、Openをクリック(②)、Project Examplesをクリック(③)します。
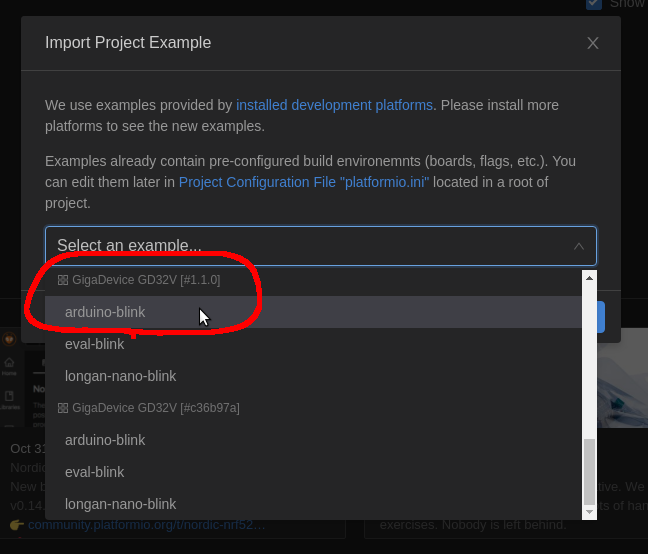
GD32Vのarduino-blinkをクリックして選択して、Importをクリックします。
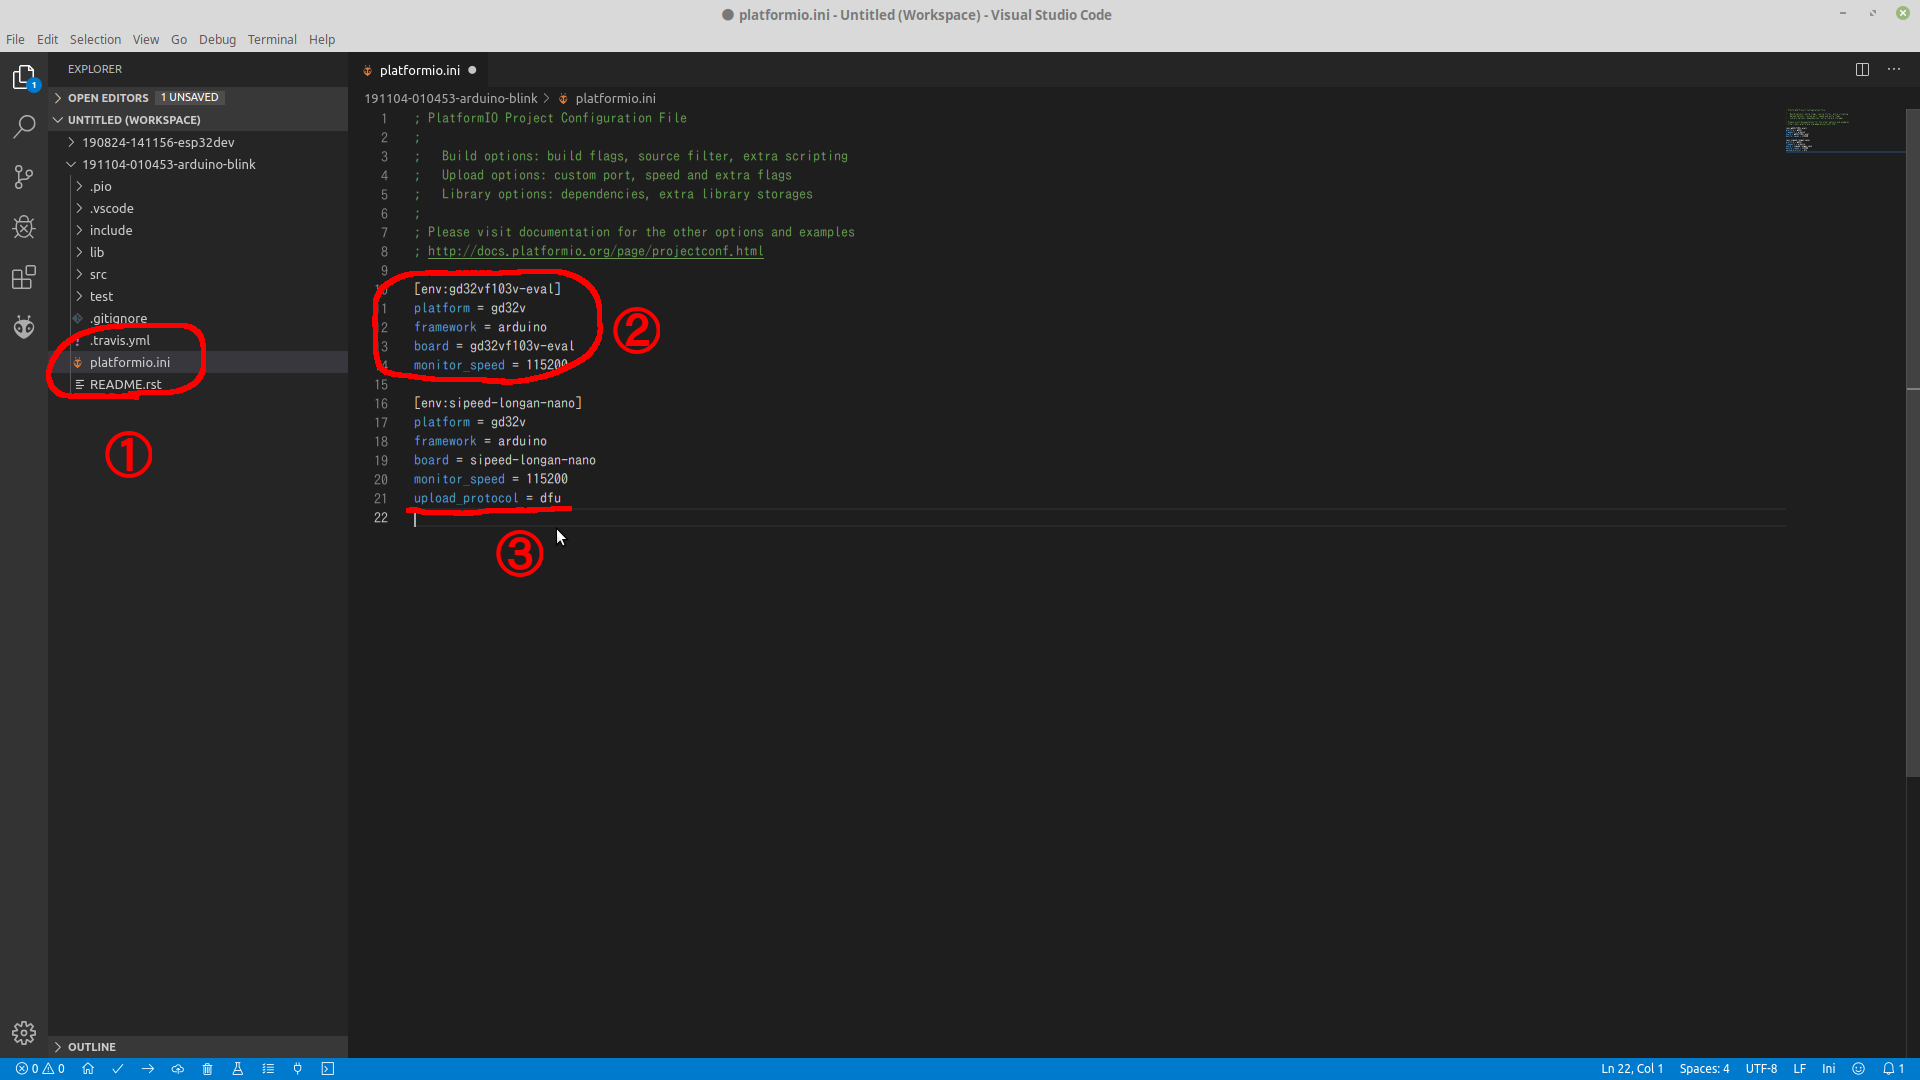
サンプルプロジェクトが作成されますので、プロジェクトディレクトリの中のplatform.iniを選択(①)して編集します。
まず、ボード定義のうち、不要な部分(gd32vf103v-evalの方、②の部分)を削除します。続いて、書き込み方法として

upload_protocol = dfu

を③の部分(env:sipeed-longan-nanoの中)に追加します。
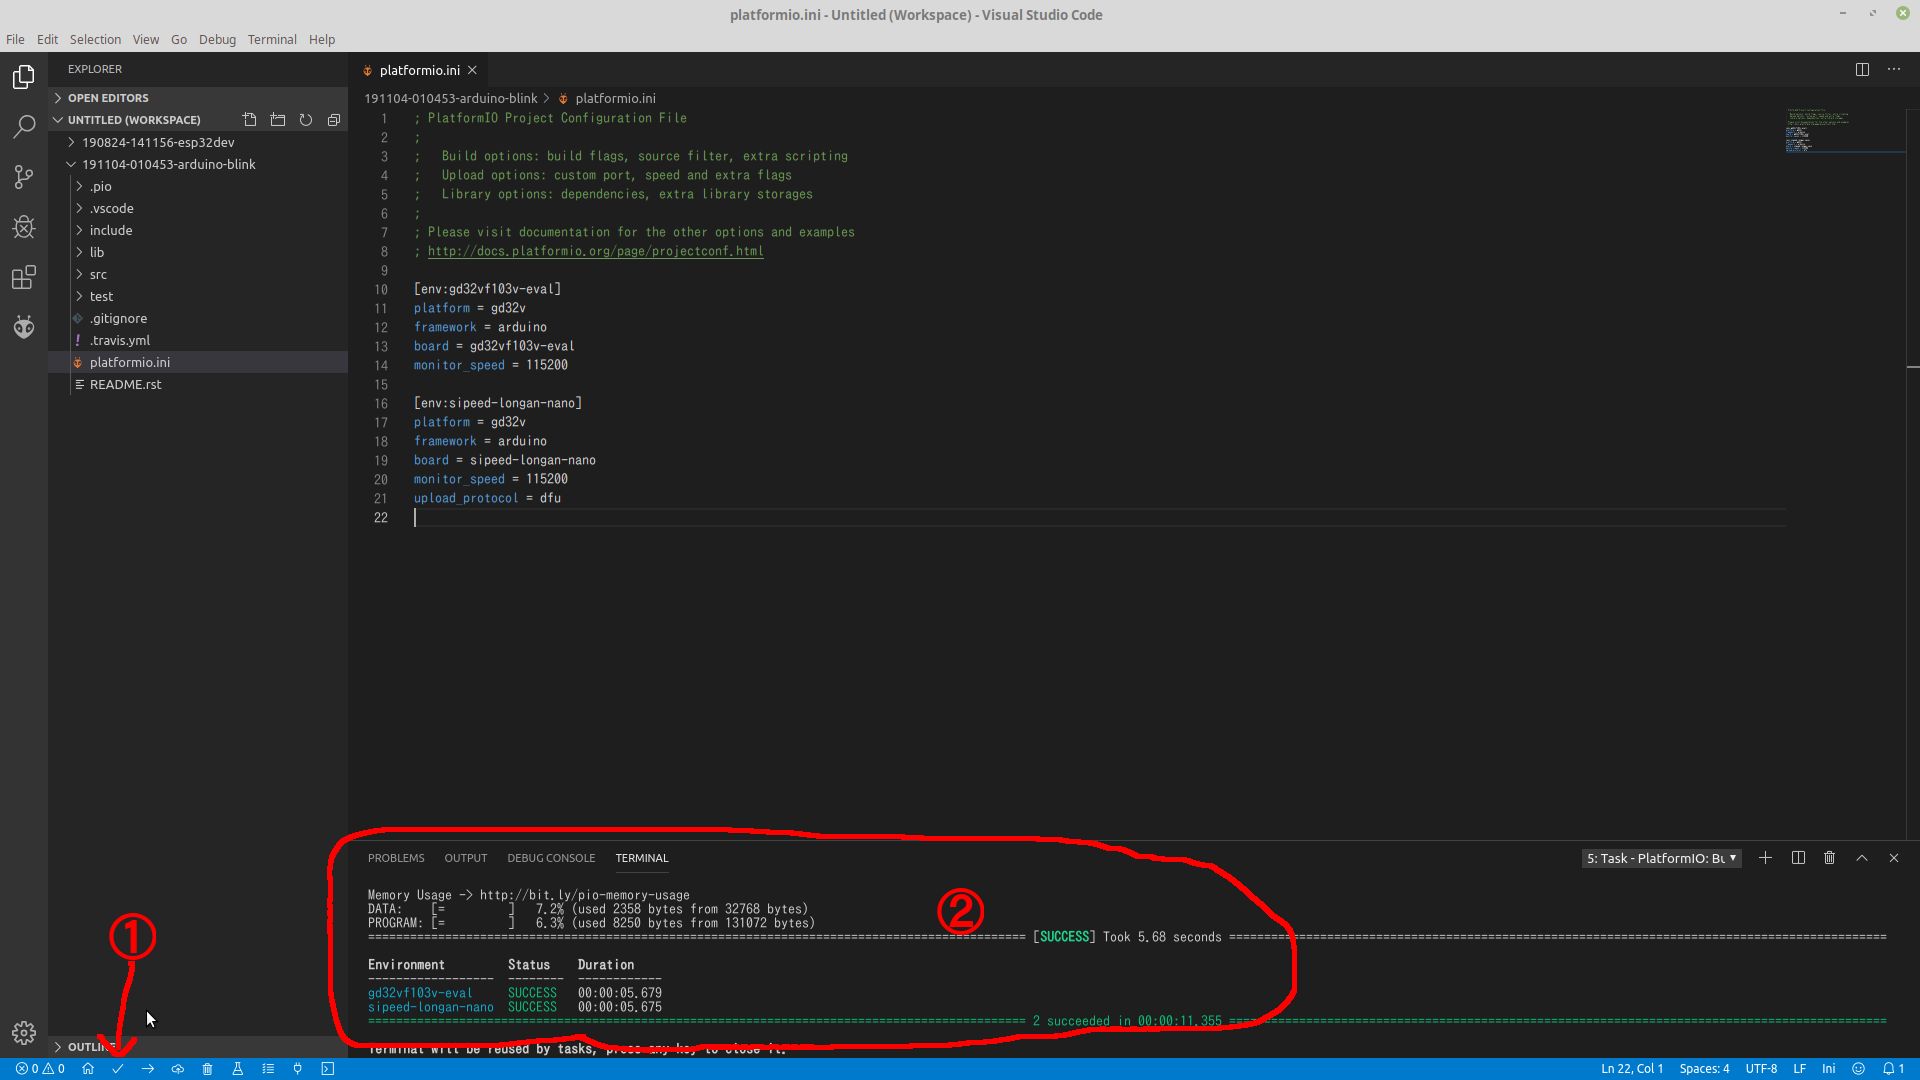
更新したら①のマークをクリックしてビルド(コンパイル)します。成功すると②のような感じで結果が表示されます。この表示をみると、ビルドすることによって評価ボード用(gd32vf103v-eval)とLongan Nano(sipeed-longan-nano)の両方のビルドがされるようですボードのgd32vf103v-evalの定義を消し忘れてました。ちなみに、ソースコードは左側のツリーのsrcの下にBlink.cppがありますので、そこで確認できます。

Longan NanoをPCに接続し、Longan NanoのBOOT0ボタンを押しながらRESETを押して(離して)、BOOT0ボタンを離すと書き込み準備ができているはず・・・・です。(要はLongan Nanoが動作を始める瞬間=RESETが離される瞬間にBOOT0が押されていればOK)
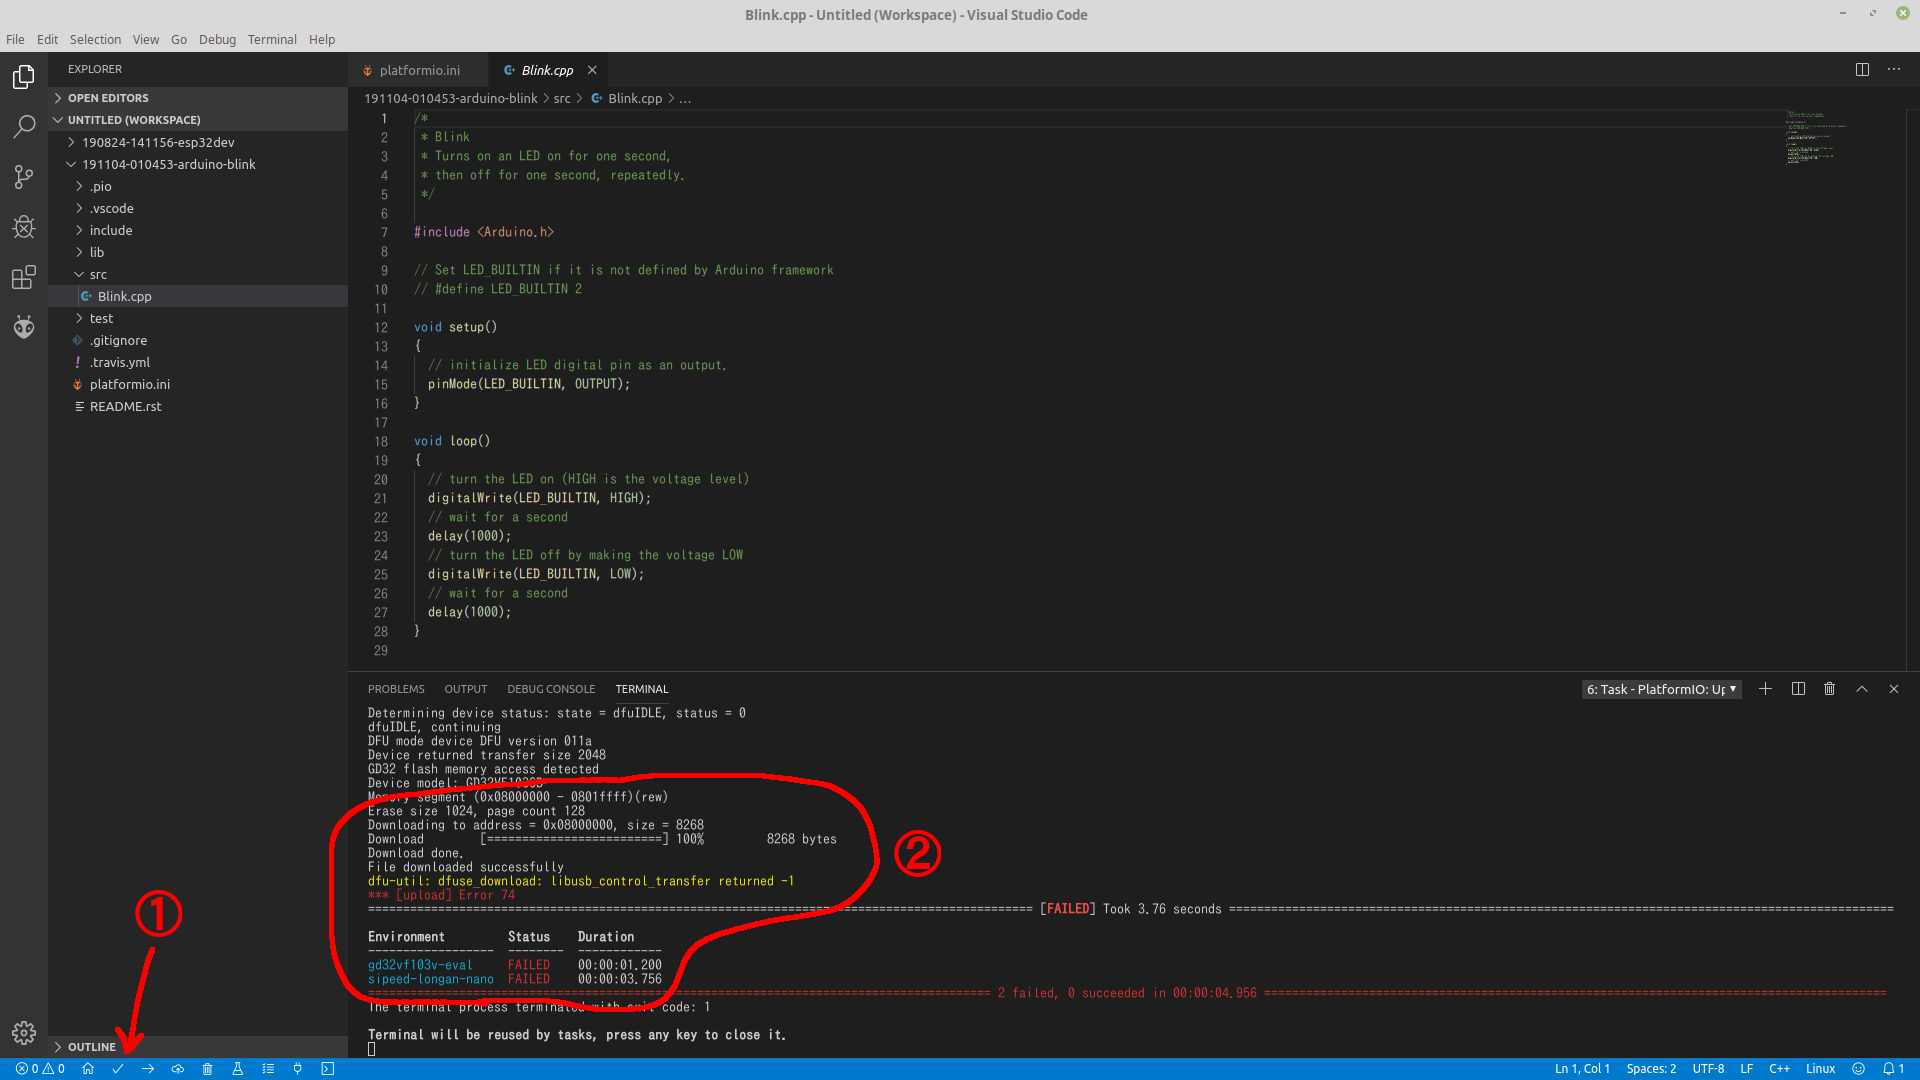
①のチェックマークを押すと書き込みが始まります。しばらく画面が流れますが、最終的に②のようにFAILEDという表示が出るのですが、LEDは赤色で点滅を始めます。ソースコードのdelay()のパラメータを変えると周期も変わりますので、書き込みはできています。

とりあえず、ギリギリ書き込みもできて、Lチカまで到達しましたが、まだまだの感じです。

> Executing task in folder 191104-010453-arduino-blink: platformio run --target upload < Processing gd32vf103v-eval (platform: gd32v; framework: arduino; board: gd32vf103v-eval) -------------------------------------------------------------------------------------------------------------------------------------------------------------------------------------------------------------------------- Verbose mode can be enabled via `-v, --verbose` option CONFIGURATION: https://docs.platformio.org/page/boards/gd32v/gd32vf103v-eval.html PLATFORM: GigaDevice GD32V 1.1.0 > GD32VF103V-EVAL
HARDWARE: GD32VF103VBT6 108MHz, 32KB RAM, 128KB Flash
DEBUG: Current (altera-usb-blaster) External (altera-usb-blaster, gd-link, jlink, rv-link, sipeed-rv-debugger, um232h)
PACKAGES: toolchain-gd32v 9.2.0, tool-openocd-gd32v 0.1.1, tool-gd32vflash 0.1.0, framework-arduino-gd32v 0.1.1
LDF: Library Dependency Finder -> http://bit.ly/configure-pio-ldf
LDF Modes: Finder ~ chain, Compatibility ~ soft
Found 0 compatible libraries
Scanning dependencies...
No dependencies
Checking size .pio/build/gd32vf103v-eval/firmware.elf
Memory Usage -> http://bit.ly/pio-memory-usage
DATA:    [=         ]   7.2% (used 2358 bytes from 32768 bytes)
PROGRAM: [=         ]   6.3% (used 8250 bytes from 131072 bytes)
Configuring upload protocol...
AVAILABLE: altera-usb-blaster, gd-link, jlink, rv-link, serial, sipeed-rv-debugger, um232h
CURRENT: upload_protocol = gd-link
Uploading .pio/build/gd32vf103v-eval/firmware.elf
openocd: error while loading shared libraries: libftdi.so.1: cannot open shared object file: No such file or directory
*** [upload] Error 127
=============================================================================================== [FAILED] Took 1.33 seconds ===============================================================================================

Processing sipeed-longan-nano (platform: gd32v; framework: arduino; board: sipeed-longan-nano)
--------------------------------------------------------------------------------------------------------------------------------------------------------------------------------------------------------------------------
Verbose mode can be enabled via `-v, --verbose` option
CONFIGURATION: https://docs.platformio.org/page/boards/gd32v/sipeed-longan-nano.html
PLATFORM: GigaDevice GD32V 1.1.0 > Sipeed Longan Nano
HARDWARE: GD32VF103CBT6 108MHz, 32KB RAM, 128KB Flash
DEBUG: Current (altera-usb-blaster) External (altera-usb-blaster, gd-link, jlink, rv-link, sipeed-rv-debugger, um232h)
PACKAGES: toolchain-gd32v 9.2.0, tool-openocd-gd32v 0.1.1, tool-gd32vflash 0.1.0, framework-arduino-gd32v 0.1.1
LDF: Library Dependency Finder -> http://bit.ly/configure-pio-ldf
LDF Modes: Finder ~ chain, Compatibility ~ soft
Found 0 compatible libraries
Scanning dependencies...
No dependencies
Checking size .pio/build/sipeed-longan-nano/firmware.elf
Memory Usage -> http://bit.ly/pio-memory-usage
DATA:    [=         ]   7.2% (used 2358 bytes from 32768 bytes)
PROGRAM: [=         ]   6.3% (used 8250 bytes from 131072 bytes)
Configuring upload protocol...
AVAILABLE: altera-usb-blaster, dfu, gd-link, jlink, rv-link, serial, sipeed-rv-debugger, um232h
CURRENT: upload_protocol = dfu
Uploading .pio/build/sipeed-longan-nano/firmware.bin
dfu-util 0.9

Copyright 2005-2009 Weston Schmidt, Harald Welte and OpenMoko Inc.
Copyright 2010-2016 Tormod Volden and Stefan Schmidt
This program is Free Software and has ABSOLUTELY NO WARRANTY
Please report bugs to http://sourceforge.net/p/dfu-util/tickets/

dfu-util: Invalid DFU suffix signature
dfu-util: A valid DFU suffix will be required in a future dfu-util release!!!
Opening DFU capable USB device...
ID 28e9:0189
Run-time device DFU version 011a
Claiming USB DFU Interface...
Setting Alternate Setting #0 ...
Determining device status: state = dfuERROR, status = 10
dfuERROR, clearing status
Determining device status: state = dfuIDLE, status = 0
dfuIDLE, continuing
DFU mode device DFU version 011a
Device returned transfer size 2048
GD32 flash memory access detected
Device model: GD32VF103CB
Memory segment (0x08000000 - 0801ffff)(rew)
Erase size 1024, page count 128
Downloading to address = 0x08000000, size = 8268
Download        [=========================] 100%         8268 bytes
Download done.
File downloaded successfully
dfu-util: dfuse_download: libusb_control_transfer returned -4
*** [upload] Error 74
=============================================================================================== [FAILED] Took 3.85 seconds ===============================================================================================

Environment         Status    Duration
------------------  --------  ------------
gd32vf103v-eval     FAILED    00:00:01.327
sipeed-longan-nano  FAILED    00:00:03.853
========================================================================================= 2 failed, 0 succeeded in 00:00:05.180 =========================================================================================
The terminal process terminated with exit code: 1

Terminal will be reused by tasks, press any key to close it.

出力を見ると、いくつか課題が見えます。

  • 書き込みも評価ボードにも行おうとして失敗していること(まあ、これはいいでしょう)
  • (Linux版の)DFUはGD32VF103には未対応であること

がわかります。

・・・・そのうち、八百万の神々によって改善されることでしょう(他力本願・・^^;)

Longan Nano情報源

Longan Nanoについての情報をメモっておきます。

Longan Nanoの開発環境をLinux環境にインストール

秋月にLongan Nanoというボードが入荷していたので買ってきました。簡単に言うと、俗に(かな?)BluePillというSTM32F103C8が載った格安のボード(AliExpressで2ドル以下)がありますが、このボードのCPUをGD32VF103というGigaDeviceという会社のRISC-Vチップに置き換えて、小型のカラーIPS液晶(見た目の雰囲気はOLEDっぽいのですが???)と(写真にはありませんが)MicroSDスロットを追加した感じの仕様のものです。USBのコネクタは今時らしくType-Cになっています。
そして、嬉しいことに、これだけの仕様で秋月で830円という激安価格で売っています。

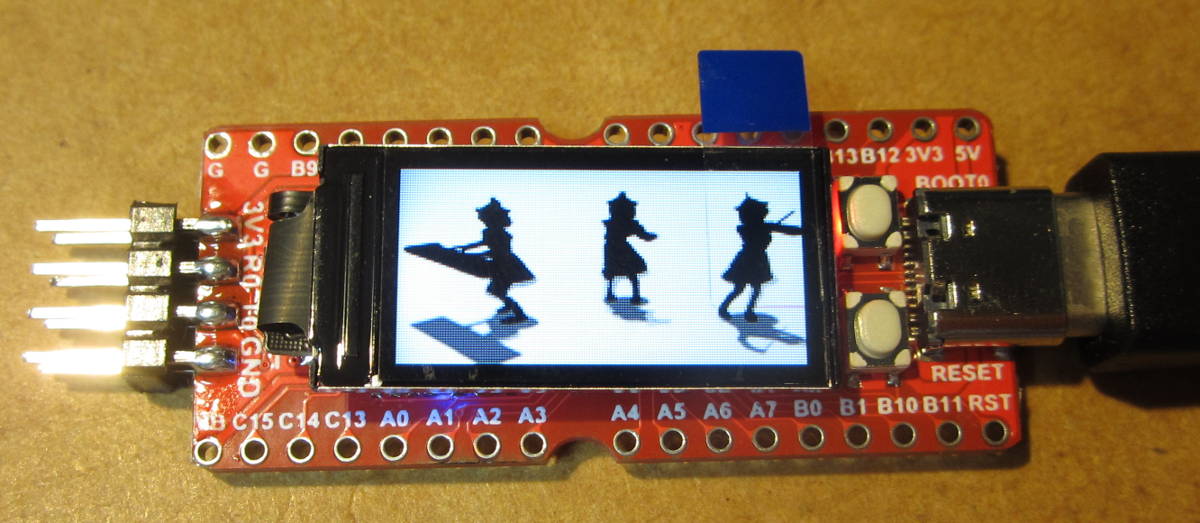
で、写真は公式サイトにあるBadAppleのデモを動かしたものです。(残念ながら、Linux環境ではDFUでのダウンロードがうまく行かず、こちらの記事に従ってWindows環境でファーム書き込みしました)

引き続き、開発環境を構築してみます。環境はいつものLinuxMintです。

公式サイトの製品Wikiによると、longan nanoの開発はPlatformIO IDEで行います。

ここでは公式サイト内のGETTING STARTEDにある手順に沿って開発環境を整えてみます。

幸い、以前、PlatformIOは試してみているので、VScodeのインストールや、PlatformIO(PIOと略されている)のインストールは省いて、GD32Vのplatformの定義のインストールから行います。作業は現時点ではコマンドラインとGUIと両方必要なようです。

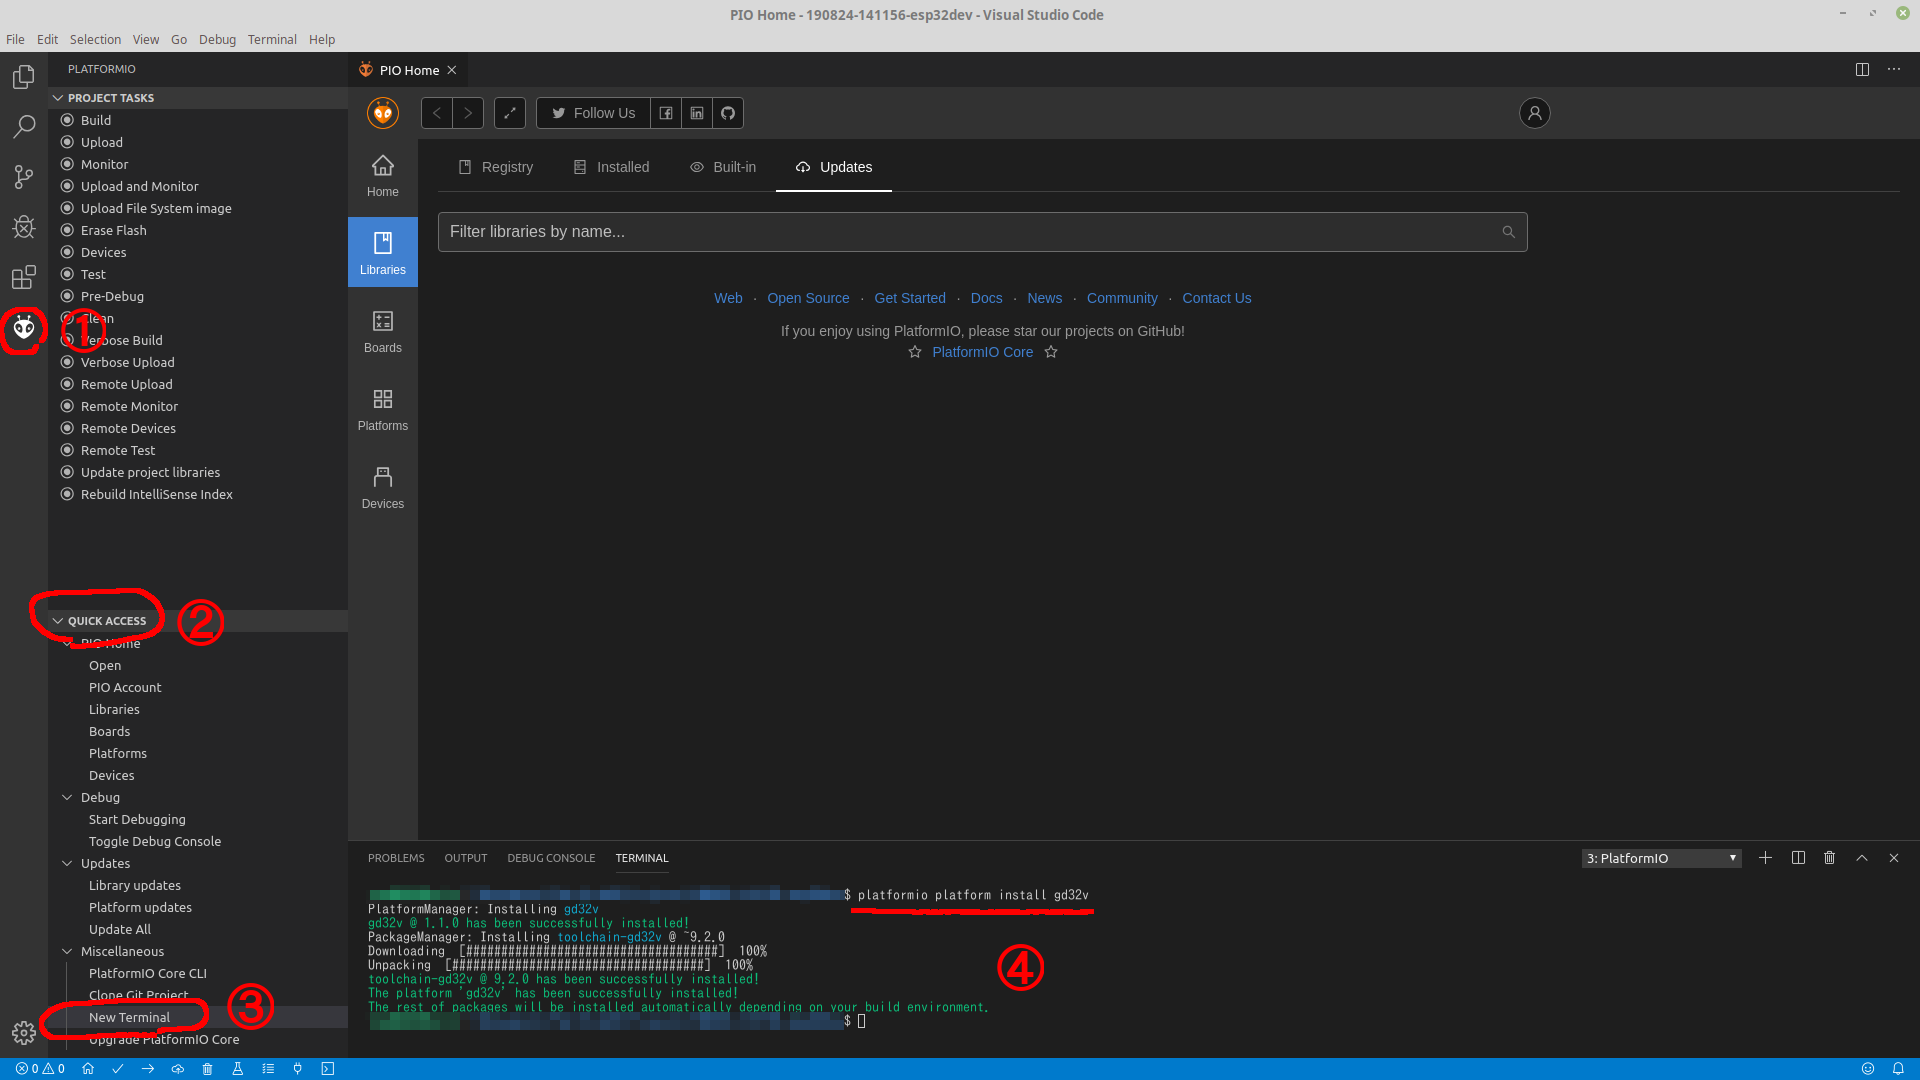
一番左のPlatformIOのロゴ(宇宙人みたいなやつ)をクリックして表示されるQUICK ACCRESSの中の「New Terminal」をクリックします。
すると、新しいターミナルのペインが開くので、そこで。

$ platformio platform install gd32v

と入力してインストールします。

$ platformio platform install gd32v
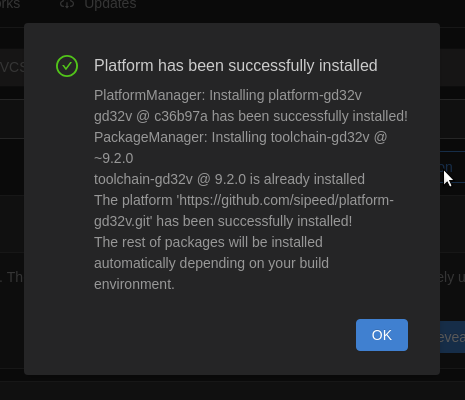
PlatformManager: Installing gd32v
gd32v @ 1.1.0 has been successfully installed!
PackageManager: Installing toolchain-gd32v @ ~9.2.0
Downloading [####################################] 100% 
Unpacking [####################################] 100% 
toolchain-gd32v @ 9.2.0 has been successfully installed!
The platform 'gd32v' has been successfully installed!
The rest of packages will be installed automatically depending on your build environment.

完了したら、GUIでの作業です。

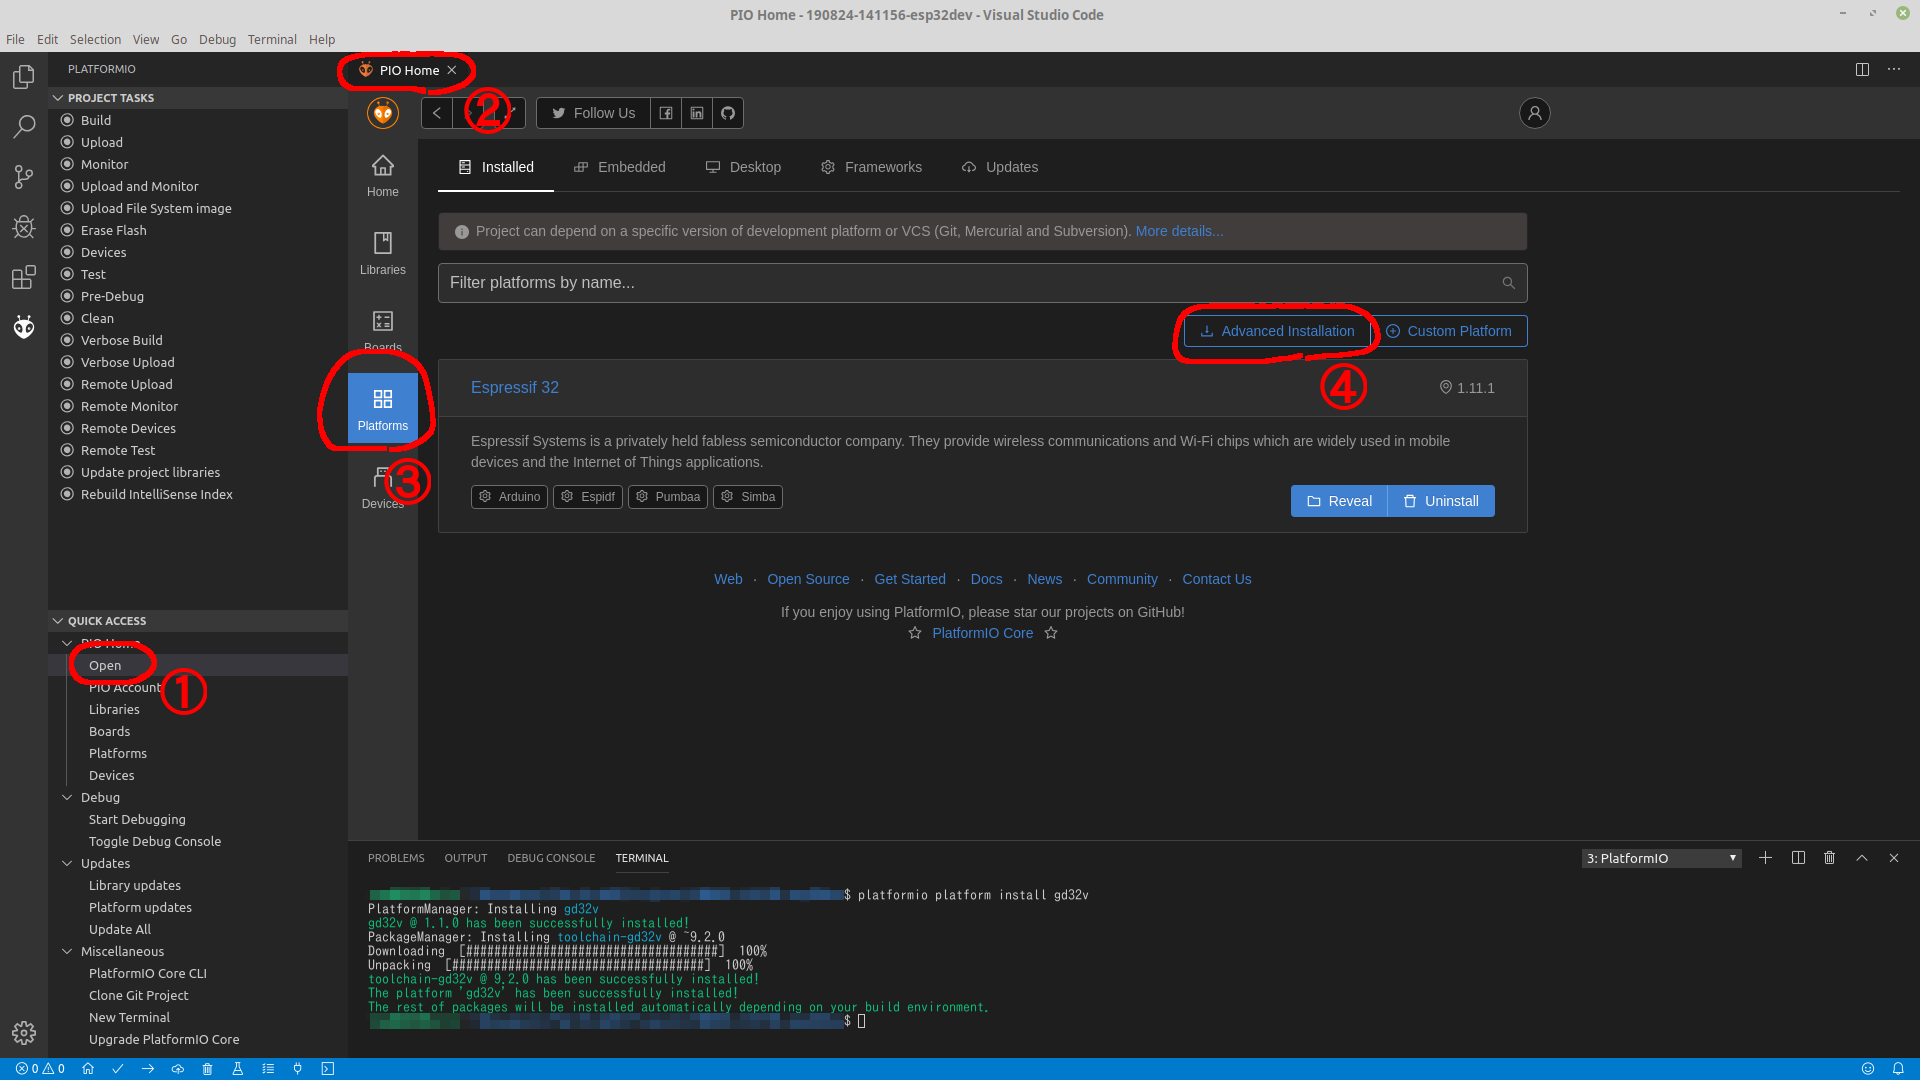
QUICK ACCRESSの中の「Open」をクリックします。
次にPIO HomeタブのPlatformsをクリック、開いたページの中の「Advanced Installation」をクリック、

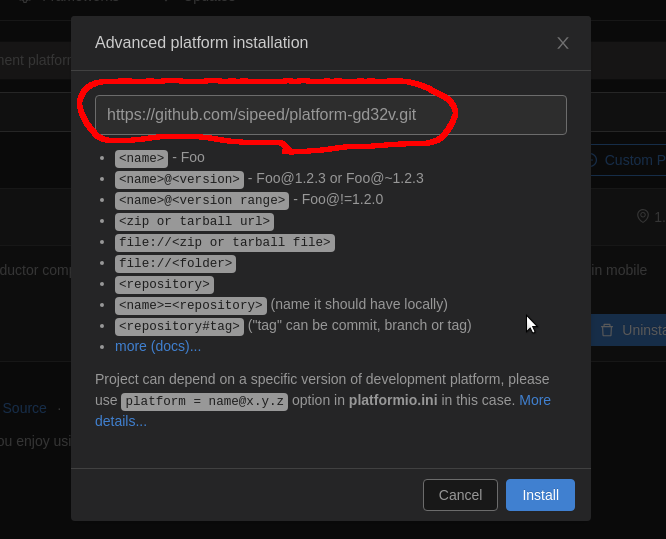
開いたダイアログで

https://github.com/sipeed/platform-gd32v.git

を入力してインストールをクリックします。

こんな感じになれば成功です。

あと、USBデバイスとして認識できるようにしておきます。

$ curl -fsSL https://raw.githubusercontent.com/platformio/platformio-core/master/scripts/99-platformio-udev.rules | sudo tee /etc/udev/rules.d/99-platformio-udev.rules
$ sudo nano /etc/udev/rules.d/99-gigadevice-udev.rules

として、udevのルールを用意します。1つ目はPlatformIOの推奨のファイルをダウンロードしてきます。2つ目はGigaDevice GD32VF103用の内容を用意します。(PlatformIOには存在しないため)

# Longan Nano
ATTRS{idVendor}=="28e9", ATTRS{idProduct}=="0189", MODE="0666"

作成したら、認識させておきます。

$ sudo udevadm control --reload-rules
$ sudo udevadm trigger

つづく

GitHubを使ってみた

これまでソースコードは自宅内サーバ上に保管していたのですが、いつもぐちゃぐちゃでわけがわからなくなっているので、GitHubのプライベートリポジトリを利用してみることにしました。

公式のチュートリアルで理解できたことは以下の通り。

1.リポジトリを作る。masterブランチが神様

統合開発環境で最初にプロジェクトを作る、というのとほぼ同じ意味だろうか。
これまで「masterってなんだろう?」と思いながら git clone していたのが理解できた。

2.一時的なブランチを作る

一時的に改変して試す環境を作る、くらいの感じだろうか。ブランチを選択するドロップダウンメニュー(のようなもの)にある「Switch branches/tags」に新しいブランチの名称を入れる。

3.作成したブランチを編集してデバッグなどを行う

チュートリアルではブラウザ上で編集できるファイルを編集しているので、ローカルで編集・デバッグする必要のあるファイルの操作方法は別途調べないといけない。
編集したら、commt changesで改変内容を commit する。

4.Pull Requestを作成する

たぶん、「masterブランチにとりこんでね!」という要求。チュートリアルだとどちらも自分なのでわかりにくい概念だけど。

5.(masterブランチ宛ての)Pull Requestをマージする

Merge pull request ボタンを押して、変更点をmasterブランチに取り込む

6.一時的なブランチを削除する


こんな感じかな??

pyftdiでI2C通信

pyftdiでI2Cデバイスをつなげてみました。

接続したデバイスは昔秋月で買ったLPS331使用の大気圧センサモジュールです。

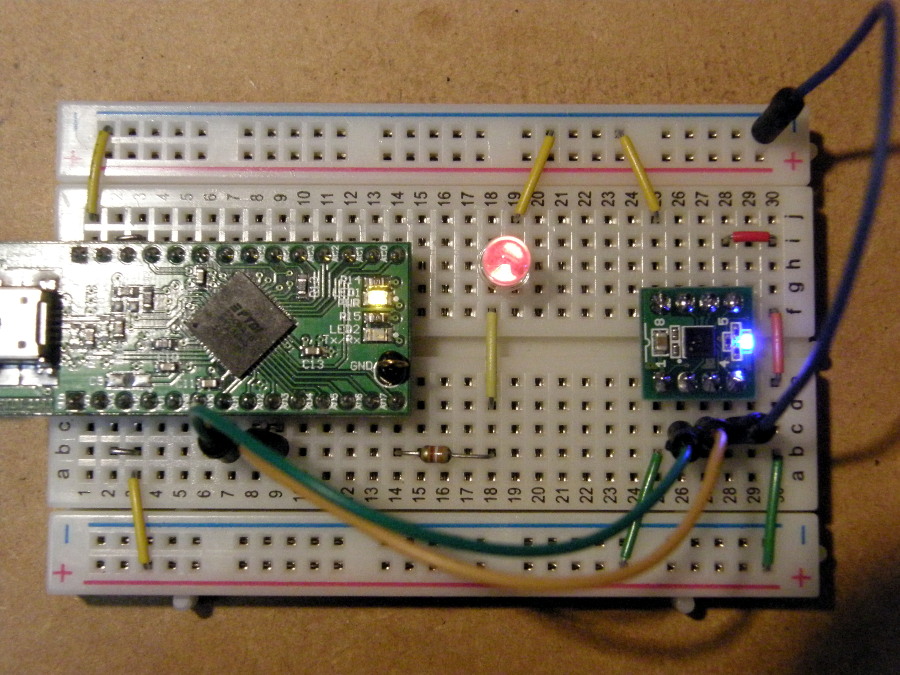
回路はこんな感じ。

右側のがLPS331使用の大気圧センサモジュール。真ん中のLEDは使用していません。

#!/usr/bin/env python3
# -*- coding: utf-8 -*-

from os import environ
import sys
from pyftdi.i2c import I2cController
from time import sleep

class LPS331(object):
    &quot;&quot;&quot;
    &quot;&quot;&quot;

    def __init__(self):
        self._i2c = I2cController()

    def open(self):
        url = environ.get('FTDI_DEVICE', 'ftdi://ftdi:232h/1')
        self._i2c.configure(url,frequency=400000)
        self._port = self._i2c.get_port(0x5c)

    def close(self):
        pass

    def init(self):
        port = self._port
        port.write([0x10,0x6A])		# Pres Average 512 / Temp Average 64
        port.write([0x20,0xF4])		# ODR=25Hz、BDU=1
    
    def read(self):
        port = self._port
        out1 = port.exchange([0x08],1)
        out2 = port.exchange([0x09],1)
        out3 = port.exchange([0x0a],1)
        refp = (out1[0] + out2[0]*256 + out3[0]*65536)/4096.0
        out1 = port.exchange([0x28],1)
        out2 = port.exchange([0x29],1)
        out3 = port.exchange([0x2a],1)
        pres = (out1[0] + out2[0]*256 + out3[0]*65536)/4096.0
        out1 = port.exchange([0x2b],1)
        out2 = port.exchange([0x2c],1)
        out = (out1[0] + out2[0]*256) 
        if out >= 0x8000 : out -= 0x10000
        temp = 42.5 + out/480.0
        return(refp,pres,temp)
        
if __name__ == '__main__':
    lps331 = LPS331()
    lps331.open()
    lps331.init()
    while True:
        (refp,pres,temp) = lps331.read()
        print(refp,pres,temp)
        sleep(1)

実行すると

$ python ftdi-lps331.py 
0.0 1012.830078125 27.485416666666666
0.0 1012.68212890625 27.504166666666666
0.0 1012.84716796875 27.525
0.0 1012.838134765625 27.508333333333333
0.0 1012.654296875 27.541666666666664
0.0 1012.570556640625 27.53125

という感じで気圧と気温を取得できました。

これでデスクトップPCでもI2Cデバイスの評価などができて便利そうです。

pyftdiでLチカ

gpio.pyをベースにpyftdiでLチカしてみました。

#!/usr/bin/env python3
# -*- coding: utf-8 -*-

from os import environ
import sys
from pyftdi.gpio import GpioController, GpioException
from time import sleep

class GpioTest(object):
    &quot;&quot;&quot;
    &quot;&quot;&quot;

    def __init__(self):
        self._gpio = GpioController()
        self._state = 0  # SW cache of the GPIO output lines

    def open(self, out_pins):
        &quot;&quot;&quot;Open a GPIO connection, defining which pins are configured as
           output and input&quot;&quot;&quot;
        out_pins &= 0xFF
        url = environ.get('FTDI_DEVICE', 'ftdi://ftdi:232h/1')
        self._gpio.open_from_url(url, direction=out_pins)

    def close(self):
        &quot;&quot;&quot;Close the GPIO connection&quot;&quot;&quot;
        self._gpio.close()

    def set_gpio(self, line, on):
        &quot;&quot;&quot;Set the level of a GPIO ouput pin.

           :param line: specify which GPIO to madify.
           :param on: a boolean value, True for high-level, False for low-level
        &quot;&quot;&quot;
        if on:
            state = self._state | (1 << line)
        else:
            state = self._state & ~(1 << line)
        self._commit_state(state)

    def get_gpio(self, line):
        &quot;&quot;&quot;Retrieve the level of a GPIO input pin

           :param line: specify which GPIO to read out.
           :return: True for high-level, False for low-level
        &quot;&quot;&quot;
        value = self._gpio.read_port()
        return bool(value & (1 << line))

    def _commit_state(self, state):
        &quot;&quot;&quot;Update GPIO outputs
        &quot;&quot;&quot;
        self._gpio.write_port(state)
        # do not update cache on error
        self._state = state


if __name__ == '__main__':
    gpio = GpioTest()
    mask = 0x80  # AD7=Out
    gpio.open(mask)
    while True:
        gpio.set_gpio(7, True)
        sleep(0.2)
        gpio.set_gpio(7, False)
        sleep(0.2)