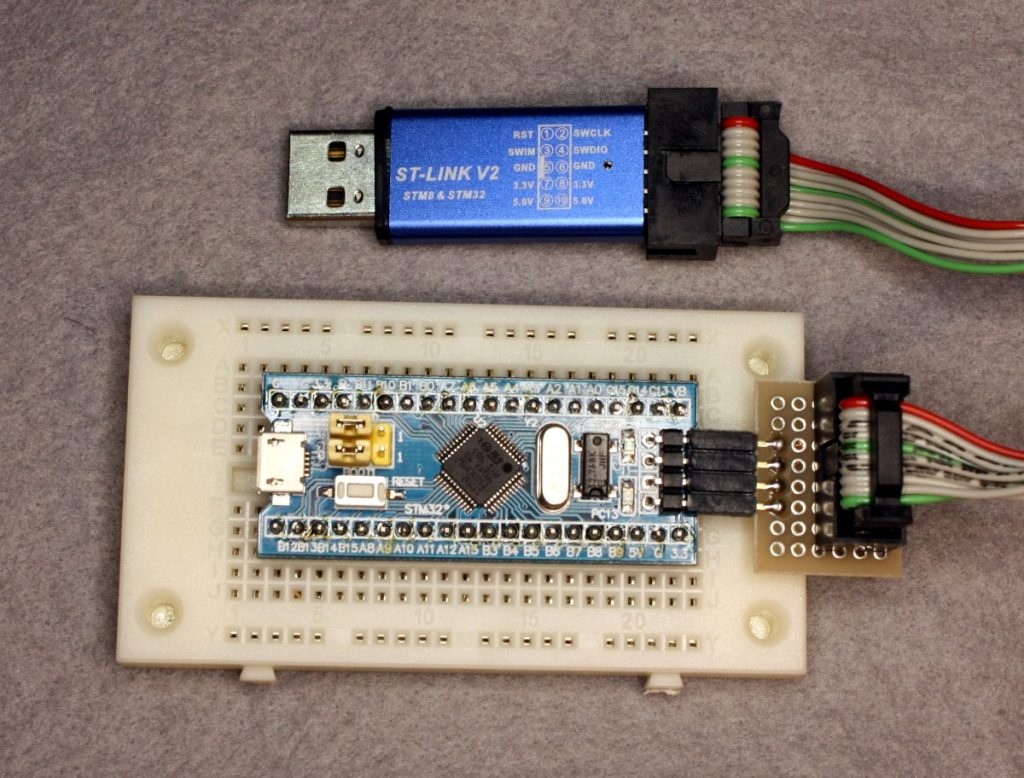
こちらを参考にやってみました。結局の所、課題はある感じです。何通りかの方法を試してみましたが、 ST-Link V2を使う方法が結局は良さそうです。
1.bootloaderの書き込み
まずは https://github.com/rogerclarkmelbourne/STM32duino-bootloader/tree/master/binaries からブートローダプログラムであるgeneric_boot20_pc13.binをダウンロードしてきて、~/Arduino/BluePil/. の下に置きました。
次に、https://github.com/rogerclarkmelbourne/Arduino_STM32/archive/master.zipからArduino開発環境をダウンロードしてきて、展開して~/Arduino/hardwareの下に置きます。
BluePillボードにシリアル接続して、接続チェックします。このときのジャンパの状態はBOOT0=1、BOOT1=0(ISPブートモード)で行いました。端子配置はコチラが参考になります。
~/Arduino/hardware/Arduino_STM32/tools/linux64/stm32flash$ ./stm32flash /dev/ttyUSB0
stm32flash Arduino_STM32_0.9

http://github.com/rogerclarkmelbourne/arduino_stm32

Interface serial_posix: 57600 8E1
Version      : 0x22
Option 1     : 0x00
Option 2     : 0x00
Device ID    : 0x0410 (Medium-density)
- RAM        : 20KiB  (512b reserved by bootloader)
- Flash      : 128KiB (sector size: 4x1024)
- Option RAM : 16b
- System RAM : 2KiB
接続が確認できたら、ブートローダを書き込んでみます。
~/Arduino/hardware/Arduino_STM32/tools/linux64/stm32flash$ ./stm32flash -w ~/Arduino/BluePil/generic_boot20_pc13.bin -v -g 0x0 /dev/ttyUSB0
stm32flash Arduino_STM32_0.9

http://github.com/rogerclarkmelbourne/arduino_stm32

Using Parser : Raw BINARY
Interface serial_posix: 57600 8E1
Version      : 0x22
Option 1     : 0x00
Option 2     : 0x00
Device ID    : 0x0410 (Medium-density)
- RAM        : 20KiB  (512b reserved by bootloader)
- Flash      : 128KiB (sector size: 4x1024)
- Option RAM : 16b
- System RAM : 2KiB
Write to memory
Erasing memory
Wrote and verified address 0x08015a48 (100.00%) Done.

Starting execution at address 0x08000000... done.
BOOT0=0、BOOT1=0(Flashブートモード)に変更して、USBケーブルを挿してみましたが・・・
[762473.049541] usb 4-3: new full-speed USB device number 89 using ohci-pci
[762473.209544] usb 4-3: device descriptor read/64, error -62
[762473.477560] usb 4-3: device descriptor read/64, error -62
[762473.741551] usb 4-3: new full-speed USB device number 90 using ohci-pci
[762473.901550] usb 4-3: device descriptor read/64, error -62
[762474.169572] usb 4-3: device descriptor read/64, error -62
[762474.277700] usb usb4-port3: attempt power cycle
[762474.749583] usb 4-3: new full-speed USB device number 91 using ohci-pci
[762475.165585] usb 4-3: device not accepting address 91, error -62
[762475.321474] usb 4-3: new full-speed USB device number 92 using ohci-pci
[762475.737532] usb 4-3: device not accepting address 92, error -62
[762475.737644] usb usb4-port3: unable to enumerate USB device
うーん、enumerateできない・・・。ググると、どうもあるある現象っぽい。あきらめます。
2.hidのブートローダを試してみる
hidのブートローダを焼いてみました。
~/Arduino/hardware/Arduino_STM32/tools/linux64/stm32flash$ ./stm32flash -w ~/Arduino/BluePil/hid_generic_pc13.bin -v -g 0x0 /dev/ttyUSB0
stm32flash Arduino_STM32_0.9

http://github.com/rogerclarkmelbourne/arduino_stm32

Using Parser : Raw BINARY
Interface serial_posix: 57600 8E1
Version      : 0x22
Option 1     : 0x00
Option 2     : 0x00
Device ID    : 0x0410 (Medium-density)
- RAM        : 20KiB  (512b reserved by bootloader)
- Flash      : 128KiB (sector size: 4x1024)
- Option RAM : 16b
- System RAM : 2KiB
Write to memory
Erasing memory
Wrote and verified address 0x080007b4 (100.00%) Done.

Starting execution at address 0x08000000... done.
ダウンロード方法にusbhidを指定してもダメ・・・。なぜかttyACM0にアクセスできないなどと表示される。
rootじゃなくてもusbhidにアクセスできるように /etc/udev/rules.d/99-stm32_hid_bl.rulesにルールを追加してもダメ・・・。
# STM32_HID_bootloader
ATTRS{idProduct}=="beba", ATTRS{idVendor}=="1209", MODE:="666"
を追加して、
$ sudo udevadm control --reload-rules
としてもダメでした。うーん。これもあきらめます。
3.ST-Link V2で書き込んでみる
ST-Link V2とBluePillを接続するアダプタを作って、ST-Link V2で試してみます。
Arduino環境にもLinuxMintにもstlinkというST-Link V2を動かすプログラムが入っていないようです(実は入ってた)ので、https://github.com/stlink-org/stlink/releases/tag/v1.6.1 からstlink-1.6.1.1_amd64.deb をダウンロードしてきてインストールします。このときに依存関係にあるものが十数個インストールされます。
そして、そのままではユーザー権限でアクセスできないので、/etc/udev/rules.d/99-st-link.rulesとして以下のファイルを作成します。
# ST-LINK/V2
ATTRS{idProduct}=="3748", ATTRS{idVendor}=="0483", MODE:="666"
作成したら、
$ sudo udevadm control --reload-rules
として適用します。これで、
$ st-flash reset
st-flash 1.6.1
2020-10-15T01:18:53 INFO common.c: F1xx Medium-density: 20 KiB SRAM, 64 KiB flash in at least 1 KiB pages.
という感じでリセットができるようになりました。
Arduino IDEで書き込み方法(Upload method)にSTLinkを指定(注:書込装置の選択ではない)してやると、書き込みの際に /home/xxxx/Arduino/hardware/Arduino_STM32/tools/linux/stlink_upload というスクリプトでエラーが出ていました。実際には64bit環境の場合にはlinuxではなくlinux64ディレクトリを使う構成ですので、
$ cd ~/Arduino/hardware/Arduino_STM32/tools
$ rm -fr linux
$ ln -s linux64 linux
としてごまかします。これで、スケッチ例のBlinkが書き込めて動作するようになりました。しかし、UARTとしては使えないので、書き込み後にttyデバイスがないっぽいエラーが出ます。
結局の所、シリアルは別に接続する必要があるようです。USB経由でシリアルを使う方法もありそうなので試してみましたが、上手くいきませんでした。やや面倒と言えば面倒ですが、この状態だとUSBはフリーになっているので、USBを使う工作で使うには便利そうです。

