
ぐぐっていたら、pipでインストールできるwebsocketsモジュールの説明
https://websockets.readthedocs.io/en/stable/intro.html
が見つかりましたので、これを試してみました。
Basic example をすっ飛ばして、Syncronization example を試しています。
まず、サーバ側です。Raspberry Pi 2で
pip install websockets
としてモジュールをインストールしてから、以下のスクリプトを動かします。
#!/usr/bin/env python

# WS server example that synchronizes state across clients

import asyncio
import json
import logging
import websockets

logging.basicConfig()

STATE = {"value": 0}

USERS = set()


def state_event():
    return json.dumps({"type": "state", **STATE})


def users_event():
    return json.dumps({"type": "users", "count": len(USERS)})


async def notify_state():
    if USERS:  # asyncio.wait doesn't accept an empty list
        message = state_event()
        await asyncio.wait([user.send(message) for user in USERS])


async def notify_users():
    if USERS:  # asyncio.wait doesn't accept an empty list
        message = users_event()
        await asyncio.wait([user.send(message) for user in USERS])


async def register(websocket):
    USERS.add(websocket)
    await notify_users()


async def unregister(websocket):
    USERS.remove(websocket)
    await notify_users()


async def counter(websocket, path):
    # register(websocket) sends user_event() to websocket
    await register(websocket)
    try:
        await websocket.send(state_event())
        async for message in websocket:
            data = json.loads(message)
            if data["action"] == "minus":
                STATE["value"] -= 1
                await notify_state()
            elif data["action"] == "plus":
                STATE["value"] += 1
                await notify_state()
            else:
                logging.error("unsupported event: {}", data)
    finally:
        await unregister(websocket)


start_server = websockets.serve(counter, "0.0.0.0", 6789)

asyncio.get_event_loop().run_until_complete(start_server)
asyncio.get_event_loop().run_forever()
別のLinuxからの接続を受けるために、最後の方のwebsockets.serve() の引数を “0.0.0.0” に変更してあります。
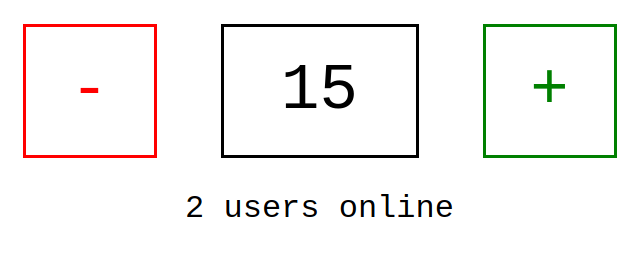
クライアントの方は、ローカルのHTMLファイルでサンプルそのままの以下の内容でHTMLファイルとして作成して、ブラウザで開きます。
<!DOCTYPE html>
<html>
    <head>
        <title>WebSocket demo</title>
        <style type="text/css">
            body {
                font-family: "Courier New", sans-serif;
                text-align: center;
            }
            .buttons {
                font-size: 4em;
                display: flex;
                justify-content: center;
            }
            .button, .value {
                line-height: 1;
                padding: 2rem;
                margin: 2rem;
                border: medium solid;
                min-height: 1em;
                min-width: 1em;
            }
            .button {
                cursor: pointer;
                user-select: none;
            }
            .minus {
                color: red;
            }
            .plus {
                color: green;
            }
            .value {
                min-width: 2em;
            }
            .state {
                font-size: 2em;
            }
        </style>
    </head>
    <body>
        <div class="buttons">
            <div class="minus button">-</div>
            <div class="value">?</div>
            <div class="plus button">+</div>
        </div>
        <div class="state">
            <span class="users">?</span> online
        </div>
        <script>
            var minus = document.querySelector('.minus'),
                plus = document.querySelector('.plus'),
                value = document.querySelector('.value'),
                users = document.querySelector('.users'),
                websocket = new WebSocket("ws://rpi2.local:6789/");
            minus.onclick = function (event) {
                websocket.send(JSON.stringify({action: 'minus'}));
            }
            plus.onclick = function (event) {
                websocket.send(JSON.stringify({action: 'plus'}));
            }
            websocket.onmessage = function (event) {
                data = JSON.parse(event.data);
                switch (data.type) {
                    case 'state':
                        value.textContent = data.value;
                        break;
                    case 'users':
                        users.textContent = (
                            data.count.toString() + " user" +
                            (data.count == 1 ? "" : "s"));
                        break;
                    default:
                        console.error(
                            "unsupported event", data);
                }
            };
        </script>
    </body>
</html>
複数のブラウザで開いて、どれかの+やーをクリックすると、他のブラウザの表示も変わりました。
ただ、これをベースにするには、pythonのasyncioを理解しないと辛そうなのと、エラー処理をどうするのか勉強が必要そうです。