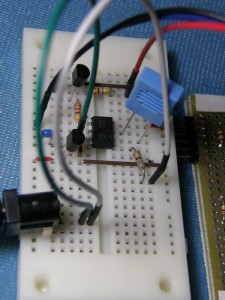
組み上げたら、まずヒューズビットを書き込みます。
$ avrdude -c avrisp2 -p t13 -P usb -t
avrdude: AVR device initialized and ready to accept instructions
Reading | ################################################## | 100% 0.01s
avrdude: Device signature = 0x1e9007
avrdude> r lfuse
>>> r lfuse
0000 6a |j |
avrdude> r hfuse
>>> r hfuse
0000 ff |. |
avrdude> w lfuse 0 0x3a
>>> w lfuse 0 0x3a
avrdude> w hfuse 0 0xff
>>> w hfuse 0 0xff
avrdude> quit
>>> quit
avrdude: safemode: Fuses OK
avrdude done. Thank you.
次に、プログラムを書き込みます。
$ avrdude -c avrisp2 -p t13 -P usb -U flash:w:TestHS15.hex:i
avrdude: AVR device initialized and ready to accept instructions
Reading | ################################################## | 100% 0.00s
avrdude: Device signature = 0x1e9007
avrdude: NOTE: FLASH memory has been specified, an erase cycle will be performed
To disable this feature, specify the -D option.
avrdude: erasing chip
avrdude: reading input file “TestHS15.hex”
avrdude: writing flash (896 bytes):
Writing | ################################################## | 100% 0.38s
avrdude: 896 bytes of flash written
avrdude: verifying flash memory against TestHS15.hex:
avrdude: load data flash data from input file TestHS15.hex:
avrdude: input file TestHS15.hex contains 896 bytes
avrdude: reading on-chip flash data:
Reading | ################################################## | 100% 0.26s
avrdude: verifying …
avrdude: 896 bytes of flash verified
avrdude: safemode: Fuses OK
avrdude done. Thank you.
・・・・が、このままではシリアルの論理が違うので、このままでは表示できません。
2SC2120を1段間に入れて、論理を反転させました。また、よく考えると温度を取得するためのLM35DZのA/D変換の基準電圧はVccで5Vが前提になっています。しかしPICによるシリアルモニタから供給できるのは3.3Vなので、正常に温度が取得できなくなるはずです。ですので、外部電源5Vで動作するように改めました。
DebianのPCにつないで、screenをシリアルターミナルとして起動すると、A/D変換値、温度、湿度の順で周期的に出力されます。(screenコマンドは、C-a H でログファイルを吐くので、その機能でファイルに記録することもできる)
ちなみに自分の部屋の湿度は暖房あり(エアコン使用)で20%台、暖房無しで30%程度でした。非常に乾燥しやすい部屋とはいえ、あってるのかよくわかりません。
そこで、ビニール袋に濡らしたティッシュペーパーと共に入れて封をして放置してみたところ、23度20%(ソースをみるとわかりますが、20%以下は計測できません)からぐんぐん袋内の湿度が上昇し、すぐに80%近く、30分くらいで90%くらいになりました。

