マイコンで制御を行う際に気になるのが、精度のよい周期処理です。ワンチップマイコンであれば直接タイマーを制御して、割り込み処理をかけてやれば精度のよい処理が簡単にできます。しかしながら、LinuxではOSの御作法に従わなければなりません。
Linuxでどうすればよいのか調べてみたところ、HRT(High Resolution Timer)というのを使えば良さそうなことがわかりましたので、試してみました。
まずは、とにかく使ってみます。
//
// コンパイル方法: $ gcc hrt_test.c -o hrt_test -lrt
//

#include <stdio.h>
#include <stdlib.h>
#include <unistd.h>
#include <time.h>
#include <inttypes.h>

static struct timespec hrt_now;
static struct timespec hrt_next;

void test(long tick)
{
    clock_gettime(CLOCK_MONOTONIC, &hrt_now);

    while(1){
        hrt_next.tv_nsec = hrt_now.tv_nsec + tick;
        if(hrt_next.tv_nsec >= 1000000000){
            hrt_next.tv_nsec -= 1000000000;
            hrt_next.tv_sec = hrt_now.tv_sec + 1;
        } else {
            hrt_next.tv_sec = hrt_now.tv_sec;
        }
        clock_nanosleep(CLOCK_MONOTONIC, TIMER_ABSTIME, &hrt_next, NULL);
        hrt_now = hrt_next;
        printf("*\n");
    }
}

int main(int argc, char *argv[]) {
    test(500000000);
    return EXIT_SUCCESS;
}
基本的な内容は、clock_gettime(CLOCK_MONOTONIC, …)で現在の精度の高い時刻を取得し、取得した時刻に制御周期を足して、clock_nanosleep(CLOCK_MONOTONIC, TIMER_ABSTIME, ….)でその時刻まで待つ、というものです。
一番参考になったのは、こことここだったりします。
このサンプルプログラムはLinuxMint11(x64)でもRaspbianでも動作し、0.5秒ごとにアスタリスクが表示されます。
次に、 これをRaspberry PiのGPIOの点滅動作に変更します。
//
// コンパイル方法: $ gcc hrt_test.c -o hrt_test -lrt
//

////////////// GPIOアクセス
//
//  How to access GPIO registers from C-code on the Raspberry-Pi
//  Example program
//  15-January-2012
//  Dom and Gert
//

// Access from ARM Running Linux

#define BCM2708_PERI_BASE        0x20000000
#define GPIO_BASE                (BCM2708_PERI_BASE + 0x200000) /* GPIO controller */

#include <stdio.h>
#include <string.h>
#include <stdlib.h>
#include <dirent.h>
#include <fcntl.h>
#include <assert.h>
#include <sys/mman.h>
#include <sys/types.h>
#include <sys/stat.h>

#include <unistd.h>
#include <time.h>
#include <inttypes.h>

#define PAGE_SIZE (4*1024)
#define BLOCK_SIZE (4*1024)

int  mem_fd;
char *gpio_mem, *gpio_map;
char *spi0_mem, *spi0_map;

// I/O access
volatile unsigned *gpio;

// GPIO setup macros. Always use INP_GPIO(x) before using OUT_GPIO(x) or SET_GPIO_ALT(x,y)
#define INP_GPIO(g) *(gpio+((g)/10)) &= ~(7<<(((g)%10)*3))
#define OUT_GPIO(g) *(gpio+((g)/10)) |=  (1<<(((g)%10)*3))
#define SET_GPIO_ALT(g,a) *(gpio+(((g)/10))) |= (((a)<=3?(a)+4:(a)==4?3:2)<<(((g)%10)*3))

#define GPIO_SET *(gpio+7)  // sets   bits which are 1 ignores bits which are 0
#define GPIO_CLR *(gpio+10) // clears bits which are 1 ignores bits which are 0
#define GPIO_GET *(gpio+13) // read   bits

#define	MAX_PORTNUM	25

char valid_port[] = {
 1,1,0,0,
 0,0,0,1,
 1,1,1,1,
 0,0,1,1,
 0,1,1,0,
 0,1,1,1,
 1,1
};

void setup_io();

int port_avail(int port)
{
	if ((port < 0) || (port > MAX_PORTNUM))
		return (0);
	return ((int)valid_port[port]);
}

int gpio_read(int port)
{
	if (!port_avail(port))
		return(0);
	return( (GPIO_GET & (1<<port)) ? 1 : 0);
}

void gpio_write(int port, int data)
{
	if (!port_avail(port))
		return;
	if (data == 0)
		GPIO_CLR = 1<<port;
	else	GPIO_SET = 1<<port;
}

//
// Set up a memory regions to access GPIO
//
int initcount= 0;
void setup_io()
{
	initcount++;
   /* open /dev/mem */
   if ((mem_fd = open("/dev/mem", O_RDWR|O_SYNC) ) < 0) {
      printf("can't open /dev/mem \n");
      exit (-1);
   }

   /* mmap GPIO */

   // Allocate MAP block
   if ((gpio_mem = malloc(BLOCK_SIZE + (PAGE_SIZE-1))) == NULL) {
      printf("allocation error \n");
      exit (-1);
   }

   // Make sure pointer is on 4K boundary
   if ((unsigned long)gpio_mem % PAGE_SIZE)
     gpio_mem += PAGE_SIZE - ((unsigned long)gpio_mem % PAGE_SIZE);

   // Now map it
   gpio_map = (char *)mmap(
      (caddr_t)gpio_mem,
      BLOCK_SIZE,
      PROT_READ|PROT_WRITE,
      MAP_SHARED|MAP_FIXED,
      mem_fd,
      GPIO_BASE
   );

   if ((long)gpio_map < 0) {
      printf("mmap error %d\n", (int)gpio_map);
      exit (-1);
   }

   // Always use volatile pointer!
   gpio = (volatile unsigned *)gpio_map;

} // setup_io

///////////////////////////
// HRTを使ったLED点滅
//

static struct timespec hrt_now;
static struct timespec hrt_next;

void test(long tick)
{
    int v;

    setup_io();
    INP_GPIO(7); // must use INP_GPIO before we can use OUT_GPIO
    OUT_GPIO(7);
    v = 1;

    clock_gettime(CLOCK_MONOTONIC, &hrt_now);

    while(1){
        hrt_next.tv_nsec = hrt_now.tv_nsec + tick;
        if(hrt_next.tv_nsec >= 1000000000){
            hrt_next.tv_nsec -= 1000000000;
            hrt_next.tv_sec = hrt_now.tv_sec + 1;
        } else {
            hrt_next.tv_sec = hrt_now.tv_sec;
        }
        clock_nanosleep(CLOCK_MONOTONIC, TIMER_ABSTIME, &hrt_next, NULL);
        hrt_now = hrt_next;
        gpio_write(7,v);
        v = 1 - v;
    }
}

int main(int argc, char *argv[]) {
    test(500000000);
    return EXIT_SUCCESS;
}
前半はGPIOを制御するためのコードで、#include の部分に追加はしていますが、Interface誌の記事のものです。
後半の部分は先ほどのアスタリスクを出力するものと一緒ですが、GPIO7を制御するように変更しています。
これで1秒周期で点滅するようになりました。
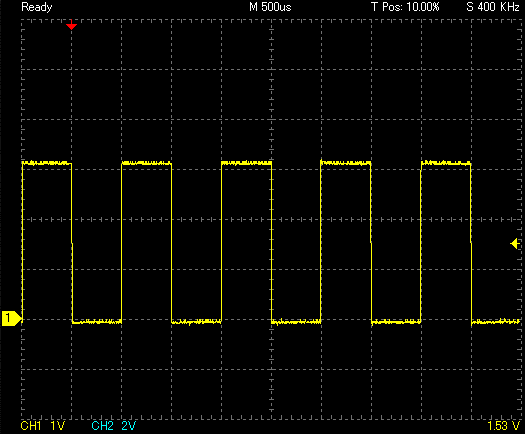
さらに、周期を1msに変更して、オシロスコープで観測してみました。
時々少し暴れてしまうようですが、この通り1ms周期でポートがH/Lを繰り返しているのが確認できました。

