TTGO T-Camera LiPO電池を接続してみました

リチウムイオン電池のコントローラ(IP5306)が搭載されているTTGO T-Cameraですが、回路図をみるとD4というダイオードが入っていて電池からIP5306に向かってしか電流が流れないので、一見充電できないように見えます。

しかし、よくみるとこれ、「2A FUSE」と書いてあります。つまり、フットプリント流用のためにダイオードのシンボルになっているようです。さらに、その右下を見ると分圧回路があり、電池の電圧がESP32で確認できるようです。そこで、電池の電圧をモニターしつつ、LiPOをつないでみることにしました。つないだのは手持ちのトイドローン用の500mAhのものをコネクタを付け替えたものです。

ソフトウェアは表示画面に3ページ目を追加してモニターするようにしてみました。

void drawFrame3(OLEDDisplay *display, OLEDDisplayUiState *state, int16_t x, int16_t y)
{
    #define AVE 32
    static String Item1, Item2, Item3, Item4;
    static uint64_t lastMs;
    static unsigned int ms;
    static long rd[AVE] , sum;
    static int idx = 0;

    if (millis() - lastMs > 50) {
        lastMs   = millis();
        ms = millis();
        rd[idx++] = (long)analogRead(35);
        if(idx==AVE) idx=0; 
        sum = 0;
        for(int i=0;i<AVE;i++){
          sum += rd[i];
        }
        float volt = (long)sum/AVE * 3300. / 4096. * 2. ;
        Item1    = "TIME: " + String((float)ms/1000.) + "s";
        Item2    = "BATT: " + String(volt/1000.) + "V";
        Item3    = "Item3:" + String(0);
        Item4    = "Item4:" + String(0);
    }
    display->setFont(ArialMT_Plain_10);
    display->setTextAlignment(TEXT_ALIGN_LEFT);
    display->drawString(0 + x,  0 + y, Item1);
    display->drawString(0 + x, 10 + y, Item2);
    display->drawString(0 + x, 20 + y, Item3);
    display->drawString(0 + x, 30 + y, Item4);
}

FrameCallback frames[] = {drawFrame1, drawFrame2, drawFrame3};
#define FRAMES_SIZE (sizeof(frames) / sizeof(frames[0]))

単純にIO35の電圧を読んだだけでは高インピーダンスで外部/内部のノイズの影響を受けているのか、スッチングノイズを拾っているのかわかりませんが、かなりブレがあります。本来ならまずはR43にコンデンサを抱かせたいところですが、面倒なので50ms周期で32回の平均を取っています。(1005のコンデンサなんて手持ちにないし・・・。そもそもESP32のADCの入力インピーダンスってどのくらいなんでしょうね。100kΩでは大きすぎるのかも?)

一方、充電電流を見てみると、PCにつないだ場合には入力側で0.4Aくらいでしたので、電池への充電電流もせいぜい0.5Aくらいで1C程度ということで問題ない範囲(本当はもう少し減らしたい)かと思ったのですが、Ankerのモバイルバッテリーにつないだところ、0.8Aくらい流れていて2C近い電流が流れてしまうようです。IP5306の中国語のデータシート(こちらの通販サイト?にあるもの)を見ると、最大1Aで充電するようですので、ちょっとまずいかもしれません。データシートをみても充電電流を調整する方法はなさそうです。

バッテリーで動作するWiFi IPカメラというのも悪くないですし、どうしたもんでしょうね。

TTGO T-Camera ファームウェア改造

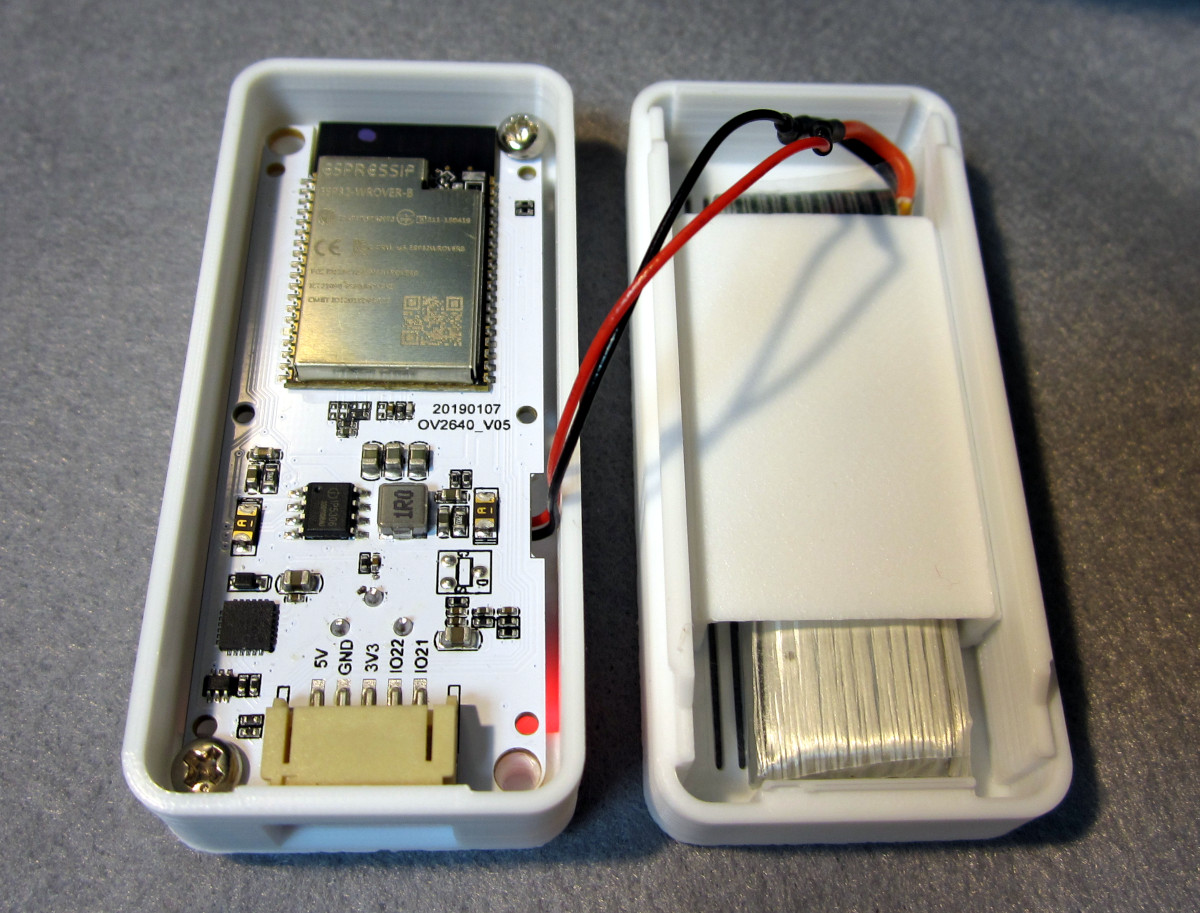
TTGO T-Cameraのファームウェアを改造してみました。

1.ファームウェア開発環境の準備

ファームウェアはArduino環境で開発しますので、まずはLinuxMint19に開発環境を導入します。

まずは、pyserialをインストールしておきます。

$ curl https://bootstrap.pypa.io/get-pip.py -o get-pip.py
$ sudo python get-pip.py 
$ sudo pip install pyserial
$ sudo apt install python3-pip 
$ sudo pip3 install pyserial

自分のユーザーアカウントを dialout グループに追加した後、一旦ログアウトしてログインし直します。

Aruduino公式サイトから arduino-1.8.9-linux64.tar.xz をダウンロードしてきて展開します。生成された arduino-1.8.9 というディレクトリをホームディレクトリ直下に移動した後、
シェルを開いて、

$ cd ~/arduino-1.8.9/
$ sudo ./install.sh

で Arduino をインストール完了です。インストールが完了したら、 「Menu → プログラミング → Arduino」でArduino IDEを起動します。次にArduino IDEの「ファイル→環境設定」で「追加のボードマネージャのURL」に

https://github.com/espressif/arduino-esp32/releases/download/1.0.2/package_esp32_dev_index.json

を設定します。引き続き、「ツール→ボード→ボードマネージャ」で「esp32 by Espressif Systems」を探してインストールします。インストールが完了したら、「ツール→ボード→ESP32 Wrover module」を選択すれば、Arduino自体の準備は完了です。

2.ソースコードの導入

ソースコードは https://github.com/lewisxhe/esp32-camera-series からZIPでダウンロードしてきます。ダウンロードした esp32-camera-series-master.zip を展開し、展開したディレクトリ名をesp32-camera-seriesに変更して、~/Arduino の下に移動します。

Arduino IDEの「ファイル→開く」で ~/Arduino/esp32-camera-series/esp32-camera-series.ino を開いておきます。

3.ライブラリの準備

Arduino OneButton Library を https://github.com/mathertel/OneButton からZIPでダウンロードしてきて、OneButton-master.zip を展開します。展開したら、ディレクトリ名をOneButtonに変更して、~/Arduino/liraries の下に移動します。

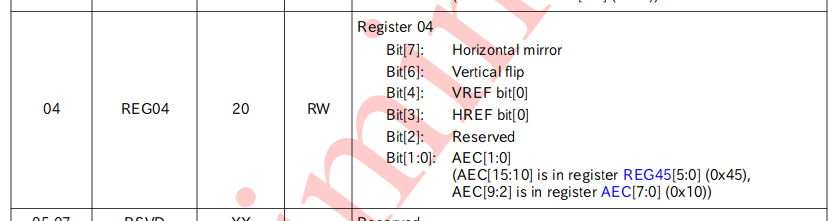
BME280のライブラリについては TTGO T-Cameraでは正常な値を表示しない(そのため、途中から削除されている)のでソースコード中の

#include <Adafruit_BME280.h>

の行はコメントアウトしておきます。

esp8266-oled-ssd1306 Library を https://github.com/ThingPulse/esp8266-oled-ssd1306 からZIPでダウンロードしてきて、esp8266-oled-ssd1306-master.zipを展開します。ディレクトリ名をesp8266-oled-ssd1306に変更して、~/Arduino/liraries の下に移動します。

ここまででビルドと書き込みはできるはずです。Arduino IDEのチェックマーク(検証)を押してコンパイルしてみます。うまく行ったら、右矢印マークを押して書き込みもテストしておきます。

4.SoftAPモードからSTAモードへ変更

#define SOFTAP_MODE //The comment will be connected to the specified ssid

をコメントアウトして、SoftAPモードを禁止して、

#define WIFI_SSID "your wifi ssid"
#define WIFI_PASSWD "you wifi password"

のところに接続先のSSIDとパスワードを設定します。

5.ESP32のIPアドレスを固定IPに変更する

SSID/PASSWORDの設定の箇所の後に以下の記述を追加

#define FIXED_IP
#ifdef FIXED_IP
IPAddress fixed_ip( 192, 168, 1, 100); // for fixed IP Address
IPAddress gateway( 192, 168, 1, 1);  // Gateway Address
IPAddress subnet(255, 255, 255, 0);  // Subnet Mask
IPAddress DNS( 8, 8, 8, 8);          // DNS server
#endif

WiFi.begin()の直前に以下の記述を追加

    #ifdef FIXED_IP
    WiFi.config(fixed_ip, gateway, subnet, DNS); // Set fixed IP address
    #endif

6.mDNS対応

ローカルネット内からはIPアドレスではなくホスト名でアクセスできると便利なので、mDNS対応させておきます。

先頭の

#include <WiFi.h>

の後に

#include <ESPmDNS.h>

を追加します。続いて、SSID/PASSWORDの設定の箇所の後に以下の記述を追加します。

#define AVAHI
#ifdef AVAHI
#define AVAHI_HOST "esp32" // esp32.local
#endif

引き続き、setup()の最後の箇所の

    Serial.print("Camera Ready! Use 'http://");
    Serial.print(ip);
    Serial.println("' to connect");

#ifdef AVAHI
    // Set up mDNS responder (reference : mDNS_Web_Server.ino)
    if (!MDNS.begin(AVAHI_HOST)) {
        Serial.println("Error setting up MDNS responder!");
        while(1) {
            delay(1000);
        }
    }
    Serial.println("mDNS responder started");

    Serial.print("Camera Ready! Use 'http://");
    Serial.print(AVAHI_HOST);
    Serial.print(".local");
    Serial.println("' to connect");
#else
    Serial.print("Camera Ready! Use 'http://");
    Serial.print(ip);
    Serial.println("' to connect");
#endif

に変更します。更に、void drawFrame1(OLEDDisplay *display, OLEDDisplayUiState *state, int16_t x, int16_t y) の中の

#ifdef SOFTAP_MODE
    display->setFont(ArialMT_Plain_10);
    display->drawString(64 + x, 25 + y, buff);
#else
    display->setFont(ArialMT_Plain_16);
    display->drawString(64 + x, 35 + y, ip);
#endif

//#ifdef AVAHI
//    display->setFont(ArialMT_Plain_10);
//    display->drawString(64 + x, 25 + y, "http://" AVAHI_HOST ".local");
//#else
    #ifdef SOFTAP_MODE
        display->setFont(ArialMT_Plain_10);
        display->drawString(64 + x, 25 + y, buff);
    #else
        display->setFont(ArialMT_Plain_16);
        display->drawString(64 + x, 35 + y, ip);
    #endif
//#endif

に書き換えます。(いくつかの行がコメントアウトになっているのは、表示にはIPアドレスもほしいためです。すべてURLでいい場合にはコメントを外します)
さらに、void drawFrame2(OLEDDisplay *display, OLEDDisplayUiState *state, int16_t x, int16_t y)の中の

    display->drawString(64 + x, 25 + y, "http://" + ip );

    #ifdef AVAHI
        display->drawString(64 + x, 25 + y, "http://" AVAHI_HOST ".local");
    #else
        display->drawString(64 + x, 25 + y, "http://" + ip );
    #endif

に書き換えます。

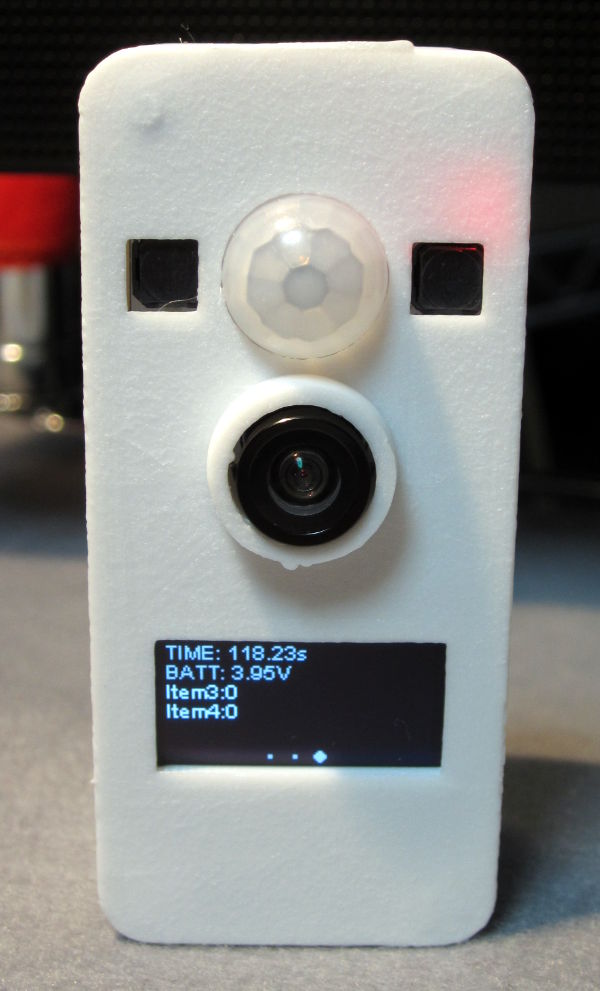
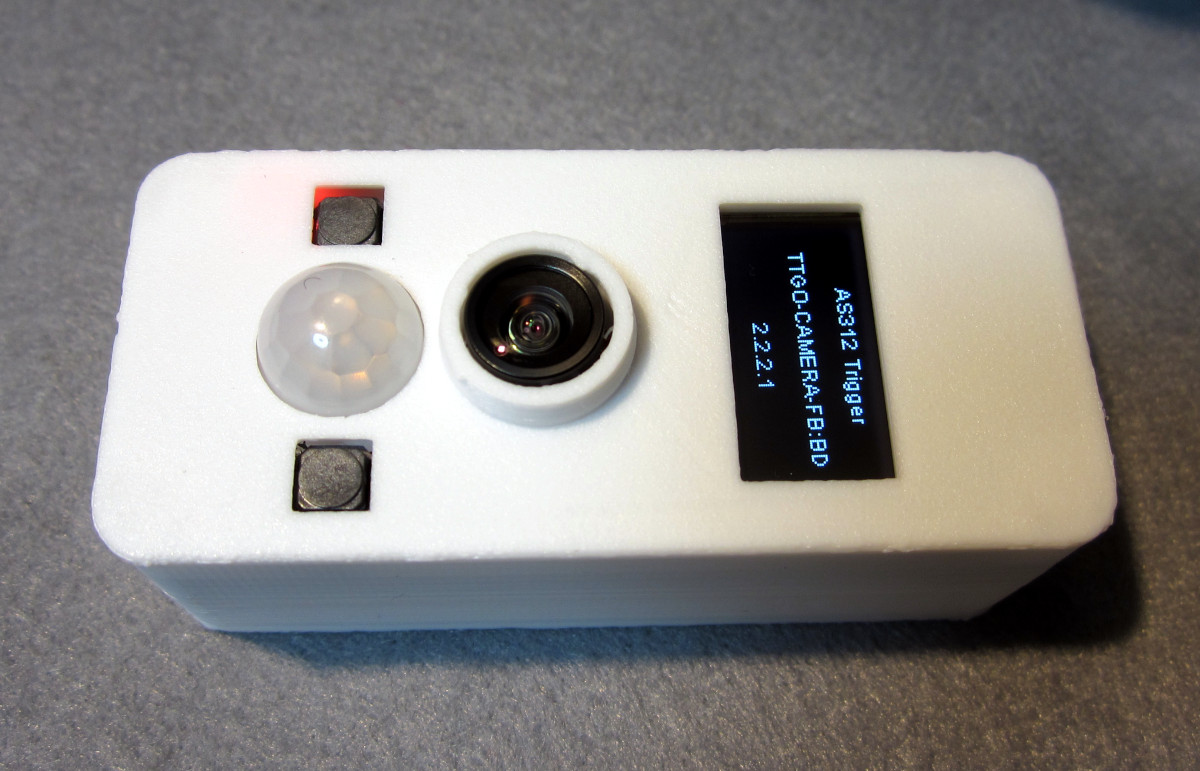
7.カメラの向きとOLEDの表示が上下逆なのを修正

oled.init();

の後あたりに

oled.flipScreenVertically();

を追加します。

これでボードに書き込むと同じサブネットのPCからは http://esp32.local で、異なるPCからは http://IPアドレス でアクセスできます。どちらもOLEDディスプレイにも表示されます。

TTGO T-Camera用ケースを作成

以前買った、TTGO T-Camera用ケースを作成しました。

添付されていたバッテリー用ケーブルを手持ちのLiPoバッテリーに接続して使えるようにしたのですが・・・・改めて回路図を確認したら、充電できない回路になっていました。(追記:回路図ではそう見えるのですが、回路図のシンボルと実物が違っていました。実際には充電可能です。)

・・・というわけで、バッテリーなし仕様の蓋を付けて完了としました。

あとはスタンドはホルダーを作成して3Dプリンタのそばに設置するのと、デフォルトのファームウェアがSoft APモードとなっていてカメラの画像を見るためにはスマホのWi-Fi設定を変更しないといけないので、これをSTAモードに変更してLAN内からアクセスできるようにしたいと思います。

※2021年6月17日追伸

STLファイルが欲しい、というお話をコメントでいただきましたので、アップロードしました。ZIPファイルの中にSTLファイルが5つ入っています。ファイル名にBATTとついているのはLiPoバッテリーを使う場合用のものです。
AsIsでの提供になりますのでご承知おきください。

TTGOCOVER.zip

3Dプリンタのベンチマークをしてみた(2)

引き続き、条件を変えてベンチマークしてみました。

今度は積層ピッチ0.1mmで出力してみました。他は標準のままです。

前回同様に出力されたものを手順書に沿って評価してみます。

1.寸法精度

  Target   X方向寸法   Y方向寸法   X方向誤差   Y方向誤差
  -----------------------------------------------------
     25       24.98      24.96       0.02       0.04
     20       20.03      19.99       0.03       0.01
     15       15.00      15.00       0.00       0.00
     10       10.06      10.05       0.06       0.05
      5        5.03       5.05       0.03       0.05
  -----------------------------------------------------
   平均誤差                           0.028      0.03
   XとYの誤差の平均  0.029
   XとYの誤差のずれ  0.002

XとYの誤差の平均が0.1以下になっていることから、この項目のスコアは5となりました。

2.正確なフローコントロール

針状の部分で評価します。

この項目では針の部分の長さが30mm以上あれば2.5、糸引きがなければさらに2.5ということなので、上記のように糸引きしているので本項目のスコアは2.5ということになります。

3.正確な抜け特性

今回は4本抜けましたので本項目のスコアは4ということになります。

4.オーバーハング

オーバーハング部分の出来具合を見ます。

上の方になるほどオーバーハングがきつくなっています。写真では一番上の15度の部分は荒れています。20度の部分はギリギリOKでしょうか。本項目のスコアは4ということになります。

5.ブリッジ

積層ピッチ0.02mmの時と違って、全部のブリッジが下に触れることなく形成できています。そのため、本項目のスコアは5ということになります。

6.XY方向の共振特性

筐体のリンギング特性を見ます。X方向とY方向の2方向があります。

積層ピッチ0.02㎜の時に見えていた6ミリピッチのムラは見えなくなっています。しかし、さらに細かいピッチのムラは健在です。本項目のスコアは0となります。

7.Z軸のアラインメント

積層ピッチ0.02mmの時よりもだいぶいいとは思うのですが、やはりピッチムラがあります。送りねじの精度だとこちらにも出てくるはずなので、違う要因なのでしょうか??
本項目のスコアは0となります。

まとめ

各項目のスコアを足すと、20.5ということになりました。

平成最後の日

平成最後の日ということで、「平成」と「令和」をそれぞれ3Dプリンタで出力してみました。

あまり深い意味はなくて、ビットマップをSVG変換してFusion360に取り込んで出力する方法を確認した際の題材にしただけです。

それぞれの文字は平成・令和それぞれが発表された際に各官房長官が持っていたものです。それぞれの写真のうち、できるだけ正面に写っているものを探して、文字の部分をGIMPで切り抜きます。平成の文字の方は墨が少し変な風に飛んでいましたので、その部分は画像処理で修正をかけました。そのうえで、色域で範囲選択、選択範囲をパスに変換した後で、SVGにエクスポートしました。それをFusion360で読み込んで3Dプリンタ用のデータにしています。

本当は地の部分は白にして、文字の部分を黒にできないかなぁ、と思い、gcodeファイルを小細工してみようと思ったのですが、エクストルーダーのデータも絶対座標で書かれていて、レイヤー単位の切り貼りくらいではダメそうでした。強引に途中でフィラメント交換することも考えましたが、STOPさせた状態ではZ軸が結構軽く動いてしまうことと、冒頭でテーブルの端を1往復してノズル先端の状態を調整するのがないと綺麗に出力されなさそうなので諦めました。Curaで本体のレイヤーの範囲(とskertの有無)を指定をしてgcodeを出力できるとそういう用途が広がるのになぁ、と思った次第です。

3Dプリンタのベンチマークをしてみた

たまたま見かけた記事から3Dプリンタのベンチマークをしてみました。

ベンチマークのためのSTLデータや評価手順などは github.com にあり、熱溶融積層型のデータはこちらにあります。

3DプリンタはEnder-3です。ノーマルからの改造個所はスプールホルダを外部に設置したうえで、記事にはしていませんがフィラメントを引き出す際の負荷が軽くなるような工夫を追加しています。その他には、出力には影響ないでしょうが、ヘッド部分のファンが糸引きしたフィラメントを吸い込みにくいようにファンガードを設置しています。使用したフィラメントはPRILINE製のPLAフィラメント(たぶんこれ)です。

早速、まずは標準設定(積層ピッチ0.2mm)で出力してみました。

出力されたものを手順書に沿って評価してみます。

1.寸法精度

  Target   X方向寸法   Y方向寸法   X方向誤差   Y方向誤差
  -----------------------------------------------------
     25       25.04      24.88       0.04       0.12
     20       20.05      20.03       0.05       0.03
     15       15.10      15.02       0.10       0.02
     10       10.04       9.99       0.04       0.01
      5        5.02       4.99       0.02       0.01
  -----------------------------------------------------
   平均誤差                           0.05       0.0475
   XとYの誤差の平均  0.04875
   XとYの誤差のずれ  0.0025

XとYの誤差の平均が0.1以下になっていることから、この項目のスコアは5となりました。

2.正確なフローコントロール

針状の部分で評価します。

この項目では針の部分の長さが30mm以上あれば2.5、糸引きがなければさらに2.5ということなので、上記のように糸引きしているので本項目のスコアは2.5ということになります。

3.正確な抜け特性(とでも訳すんでしょうか)

最初の写真の手前側の凸の部分はピンと周りの間に設計上は隙間があって抜けるようになっていますが、実際には寸法精度などにより全部は抜けません。これが工具などを使わずに手だけで抜ける個数を調べます。今回は3本抜けましたので本項目のスコアは3ということになります。

4.オーバーハング

オーバーハング部分の出来具合を見ます。

上の方になるほどオーバーハングがきつくなっています。写真では一番上の15度の部分は荒れていますが、20度の部分はギリギリOKでしょうか。だとすると本項目のスコアは4ということになります。

5.ブリッジ

上記の感じだと1番上のブリッジは垂れて2番目のブリッジに触れてしまっています。2番目のブリッジは垂れていますが、3番目のブリッジには触れていません。そのため、本項目のスコアは4ということになります。

6.XY方向の共振特性

筐体のリンギング特性を見ます。X方向とY方向の2方向があります。

主に目盛りのセンターの長い部分の影響を受けたリンギングをみるのだけど、センターに関係なくX方向もY方向も6ミリピッチのムラが出ています。また、さらに細かいピッチのムラも見えています。本項目のスコアは0となります。
6ミリピッチはモータかモータのタイミングベルトのスプロケットあたりなんでしょうか?細かいピッチはタイミングベルト由来でしょうか?

7.Z軸のアラインメント

本来はZ軸の送りねじのピッチむらを見るものだと思うのですが、ピッチむらどころではない残念な感じですね。送りねじの精度がかなり悪いのかもしれません。本項目のスコアは0となります。

まとめ

各項目のスコアを足すと、18.5ということになります。ちなみに、Prusa i3 MK3 で 22.5 、Makerbot Replicator 2 で 18 ということだそうです。

2万5千円の3Dプリンタとしては健闘しているのでは、と思います。

dockerをarm64にインストール

ついでなので、dockerをarm64なubuntuにインストールしてみました。
最初、LinutMintと同じ方法で試してみたのですが、途中でエラーがでてうまく行きませんでした。最終的にはスクリプトを使う方法でインストールしました。

ターゲットはPine A64+上のArmbian Ubuntuです。MicroSDカードで初回起動後、armbian-configにてUSBメモリにインストールしたものです。インストールした際のログは以下のとおりです。

 ____  _             __   _  _   
|  _ \(_)_ __   ___ / /_ | || |  
| |_) | | '_ \ / _ \ '_ \| || |_ 
|  __/| | | | |  __/ (_) |__   _|
|_|   |_|_| |_|\___|\___/   |_|  
                                 

Welcome to ARMBIAN 5.75 stable Ubuntu 18.04.2 LTS 4.19.25-sunxi64   
System load:   0.00 0.00 0.00  	Up time:       2:18 hours		
Memory usage:  5 % of 2001MB 	IP:            10.89.106.15
CPU temp:      38°C           	
Usage of /:    9% of 29G    	

Last login: Sun Apr 21 01:25:45 2019 from 10.89.106.43

xxx@pine64plus:~$ curl -fsSL get.docker.com -o get-docker.sh
xxx@pine64plus:~$ sudo sh get-docker.sh
[sudo] password for xxx: 
# Executing docker install script, commit: 2f4ae48
+ sh -c apt-get update -qq >/dev/null
+ sh -c apt-get install -y -qq apt-transport-https ca-certificates curl >/dev/null
+ sh -c curl -fsSL "https://download.docker.com/linux/ubuntu/gpg" | apt-key add -qq - >/dev/null
Warning: apt-key output should not be parsed (stdout is not a terminal)
+ sh -c echo "deb [arch=arm64] https://download.docker.com/linux/ubuntu bionic stable" > /etc/apt/sources.list.d/docker.list
+ sh -c apt-get update -qq >/dev/null
+ [ -n  ]
+ sh -c apt-get install -y -qq --no-install-recommends docker-ce >/dev/null
+ sh -c docker version
Client:
 Version:           18.09.5
 API version:       1.39
 Go version:        go1.10.8
 Git commit:        e8ff056
 Built:             Thu Apr 11 04:48:27 2019
 OS/Arch:           linux/arm64
 Experimental:      false

Server: Docker Engine - Community
 Engine:
  Version:          18.09.5
  API version:      1.39 (minimum version 1.12)
  Go version:       go1.10.8
  Git commit:       e8ff056
  Built:            Thu Apr 11 04:11:17 2019
  OS/Arch:          linux/arm64
  Experimental:     false
If you would like to use Docker as a non-root user, you should now consider
adding your user to the "docker" group with something like:

  sudo usermod -aG docker your-user

Remember that you will have to log out and back in for this to take effect!

WARNING: Adding a user to the "docker" group will grant the ability to run
         containers which can be used to obtain root privileges on the
         docker host.
         Refer to https://docs.docker.com/engine/security/security/#docker-daemon-attack-surface
         for more information.
xxx@pine64plus:~$ sudo usermod -aG docker xxx
xxx@pine64plus:~$

結局、手順としては非常に簡単で、

~$ curl -fsSL get.docker.com -o get-docker.sh
~$ sudo sh get-docker.sh
~$ sudo usermod -aG docker xxx

という感じでスクリプトをダウンロードしてきて実行するだけです。

TensorFlowを試してみる(1)

ふとTensorFlowを試してみたくなりました。(そのためにDocker環境作ってました)

で、なかなかよさげなTensorFlowのチュートリアルを発見しました。

TensorFlow入門(https://deepinsider.jp/tutor/introtensorflow

こちらを参考に進めてみます。

第2回の環境構築でつまづきましたので、そのメモです。

環境は、冒頭に書いたとおり、TensorFlowを試すためにDockerの環境を作ったので、Docker前提で進めます。(Docker環境にしたのは、現状のLinuxMintの環境をできるだけ壊さないためです)

で、TensorFlowの公式サイト(https://www.tensorflow.org/install/)を参考にTensorFlowコンテナをインストール、起動します。

~/docker$ cd tensorflow/
~/docker/tensorflow$ 
~/docker$ cd tensorflow/
~/docker/tensorflow$ docker pull tensorflow/tensorflow 
Using default tag: latest
latest: Pulling from tensorflow/tensorflow
7b722c1070cd: Pull complete 
(中略)
9c2312dbc5d7: Pull complete 
Digest: sha256:40844012558fe881ec58faf1627fd4bb3f64fe9d46a2fd8af70f139244cfb538
Status: Downloaded newer image for tensorflow/tensorflow:latest
~/docker/tensorflow$ docker run -u $(id -u):$(id -g) -it -p 8888:8888 tensorflow/tensorflow

________                               _______________                
___  __/__________________________________  ____/__  /________      __
__  /  _  _ \_  __ \_  ___/  __ \_  ___/_  /_   __  /_  __ \_ | /| / /
_  /   /  __/  / / /(__  )/ /_/ /  /   _  __/   _  / / /_/ /_ |/ |/ / 
/_/    \___//_/ /_//____/ \____//_/    /_/      /_/  \____/____/|__/


You are running this container as user with ID 1000 and group 1000,
which should map to the ID and group for your user on the Docker host. Great!

tf-docker / >

公式サイトの冒頭の起動方法では、まず docker run コマンドに -u オプションをつけろ、と警告が出ます。上記では「-u $(id -u):$(id -g)」を付けています。
しかし、この環境では python のバージョンを確認すると2.7でした。python3とするためにコンテナのタグに-py3を付けます。

~/docker/tensorflow$ docker run -u $(id -u):$(id -g) -it -p 8888:8888 tensorflow/tensorflow:latest-py3 python
Unable to find image 'tensorflow/tensorflow:latest-py3' locally
latest-py3: Pulling from tensorflow/tensorflow
7b722c1070cd: Already exists 
(中略)
3fce84e77cad: Pull complete 
Digest: sha256:7309cfcdc1adbde8925f8cb301f802053bfa15d69a6605c8b73fe19ce9ab2a78
Status: Downloaded newer image for tensorflow/tensorflow:latest-py3
Python 3.5.2 (default, Nov 12 2018, 13:43:14) 
[GCC 5.4.0 20160609] on linux
Type "help", "copyright", "credits" or "license" for more information.
>>> import tensorflow as tf
>>> sess = tf.InteractiveSession()
2019-04-19 20:30:24.944775: I tensorflow/core/platform/profile_utils/cpu_utils.cc:94] CPU Frequency: 2793680000 Hz
2019-04-19 20:30:24.945045: I tensorflow/compiler/xla/service/service.cc:150] XLA service 0x37004b0 executing computations on platform Host. Devices:
2019-04-19 20:30:24.945079: I tensorflow/compiler/xla/service/service.cc:158]   StreamExecutor device (0): <undefined>, <undefined>
>>> message = tf.constant('Hello, Tensorflow!')
>>> message.eval()
b'Hello, Tensorflow!'
>>> sess.close()
>>>

python3での対話モードでの確認もエラーは出ませんでした。が、こんどは Jupyter Notebookでハマります。結局、ホスト側でJupyter Notebookのディレクトリをまず作ります。

~/docker/tensorflow$ mkdir ~/notebooks

その上で、Jupyter Notebookに対応したイメージを引っ張ってきて起動します。

~/docker/tensorflow$ docker run -u $(id -u):$(id -g) -it --rm -v $(realpath ~/notebooks):/tf -p 8888:8888 tensorflow/tensorflow:latest-py3-jupyter
Unable to find image 'tensorflow/tensorflow:latest-py3-jupyter' locally
latest-py3-jupyter: Pulling from tensorflow/tensorflow
7b722c1070cd: Pull complete 
(中略)
12156a969bcb: Pull complete 
Digest: sha256:aaf427d8590ae2935f6c9d39851380402d7ce422b7e26315f73df59f774614f3
Status: Downloaded newer image for tensorflow/tensorflow:latest-py3-jupyter

________                               _______________                
___  __/__________________________________  ____/__  /________      __
__  /  _  _ \_  __ \_  ___/  __ \_  ___/_  /_   __  /_  __ \_ | /| / /
_  /   /  __/  / / /(__  )/ /_/ /  /   _  __/   _  / / /_/ /_ |/ |/ / 
/_/    \___//_/ /_//____/ \____//_/    /_/      /_/  \____/____/|__/


You are running this container as user with ID 1000 and group 1000,
which should map to the ID and group for your user on the Docker host. Great!

[I 21:04:46.052 NotebookApp] Writing notebook server cookie secret to /.local/share/jupyter/runtime/notebook_cookie_secret
/usr/local/lib/python3.5/dist-packages/IPython/paths.py:68: UserWarning: IPython parent '/' is not a writable location, using a temp directory.
  " using a temp directory.".format(parent))
[I 21:04:46.328 NotebookApp] Serving notebooks from local directory: /tf
[I 21:04:46.328 NotebookApp] The Jupyter Notebook is running at:
[I 21:04:46.328 NotebookApp] http://(d3798d48a88f or 127.0.0.1):8888/?token=3dcab8dd69809896495d64041dba74e654c52612ea877c70
[I 21:04:46.328 NotebookApp] Use Control-C to stop this server and shut down all kernels (twice to skip confirmation).
[C 21:04:46.334 NotebookApp] 
    
    To access the notebook, open this file in a browser:
        file:///.local/share/jupyter/runtime/nbserver-12-open.html
    Or copy and paste one of these URLs:
        http://(d3798d48a88f or 127.0.0.1):8888/?token=3dcab8dd69809896495d64041dba74e654c52612ea877c70


ということで、

docker run -u $(id -u):$(id -g) -it --rm -v $(realpath ~/notebooks):/tf -p 8888:8888 tensorflow/tensorflow:latest-py3-jupyter

で起動するのが最終形となりました。起動後、ブラウザで表示されたトークンを含む形(今回の起動であれば http://127.0.0.1:8888/?token=3dcab8dd69809896495d64041dba74e654c52612ea877c70 )にアクセスすると、

こんな感じでアクセスできました。ちなみに、Docker環境を終了させる場合には、Ctrl + Cで「y」入力です。

とりあえず、第2回まで完了です。

Dockerでイメージ・コンテナを作ってみる

とりあえず、空のubuntuのイメージの雛形を作ってみる。

~/docker$ mkdir ubuntu
~/docker$ cd ubuntu/
~/docker/ubuntu$ vi Dockerfile
~/docker/ubuntu$ cat Dockerfile 
FROM ubuntu
RUN apt-get update && apt-get -y upgrade

~/docker/ubuntu$ docker build -t my-ubuntu .
Sending build context to Docker daemon  2.048kB
Step 1/2 : FROM ubuntu
latest: Pulling from library/ubuntu
898c46f3b1a1: Pull complete 
63366dfa0a50: Pull complete 
041d4cd74a92: Pull complete 
6e1bee0f8701: Pull complete 
Digest: sha256:017eef0b616011647b269b5c65826e2e2ebddbe5d1f8c1e56b3599fb14fabec8
Status: Downloaded newer image for ubuntu:latest
 ---> 94e814e2efa8
Step 2/2 : RUN apt-get update && apt-get -y upgrade
 ---> Running in 50e2bec7ad22
Get:1 http://security.ubuntu.com/ubuntu bionic-security InRelease [88.7 kB]
(中略)
Processing triggers for libc-bin (2.27-3ubuntu1) ...
Removing intermediate container 50e2bec7ad22
 ---> 41196711534e
Successfully built 41196711534e
Successfully tagged my-ubuntu:latest
~/docker/ubuntu$ docker images
REPOSITORY          TAG                 IMAGE ID            CREATED             SIZE
my-ubuntu           latest              41196711534e        4 minutes ago       124MB
ubuntu              latest              94e814e2efa8        5 weeks ago         88.9MB
~/docker/ubuntu$ 

Dockerfileに元になるイメージとイメージ生成時に実行するコマンドを記述して、docker build コマンドでイメージを実際に作成、docker images コマンドで作成されたイメージを確認。元になった ubuntu イメージと作成した my-ubuntu イメージが存在することを確認。

~/docker/ubuntu$ docker run -it my-ubuntu
root@0420f9cf8484:/# w
 19:18:00 up  1:40,  0 users,  load average: 0.11, 0.15, 0.20
USER     TTY      FROM             LOGIN@   IDLE   JCPU   PCPU WHAT
root@0420f9cf8484:/# ifconfig
bash: ifconfig: command not found
root@0420f9cf8484:/# apt-get -q install -y net-tools
Reading package lists...
(中略)
Setting up net-tools (1.60+git20161116.90da8a0-1ubuntu1) ...
root@0420f9cf8484:/# ifconfig
eth0: flags=4163<UP,BROADCAST,RUNNING,MULTICAST>  mtu 1500
        inet 172.17.0.2  netmask 255.255.0.0  broadcast 172.17.255.255
        ether 02:42:ac:11:00:02  txqueuelen 0  (Ethernet)
        RX packets 120  bytes 205313 (205.3 KB)
        RX errors 0  dropped 0  overruns 0  frame 0
        TX packets 82  bytes 5554 (5.5 KB)
        TX errors 0  dropped 0 overruns 0  carrier 0  collisions 0

lo: flags=73<UP,LOOPBACK,RUNNING>  mtu 65536
        inet 127.0.0.1  netmask 255.0.0.0
        loop  txqueuelen 1000  (Local Loopback)
        RX packets 0  bytes 0 (0.0 B)
        RX errors 0  dropped 0  overruns 0  frame 0
        TX packets 0  bytes 0 (0.0 B)
        TX errors 0  dropped 0 overruns 0  carrier 0  collisions 0

root@0420f9cf8484:/# exit
exit
~/docker/ubuntu$

イメージを起動するが、net-toolsもない状態なので ifconfig もエラーになる。
そこで net-tools をインストールして ifconfig コマンドを実行。当然うまくいくが、そのまま終了してみる。

~/docker/ubuntu$ docker ps -a
CONTAINER ID        IMAGE               COMMAND             CREATED             STATUS                      PORTS               NAMES
0420f9cf8484        my-ubuntu           "/bin/bash"         5 minutes ago       Exited (0) 47 seconds ago                       nifty_volhard
~/docker/ubuntu$ docker rm 0420f9cf8484
0420f9cf8484
~/docker/ubuntu$ docker ps -a
CONTAINER ID        IMAGE               COMMAND             CREATED             STATUS              PORTS               NAMES
~/docker/ubuntu$ docker run -it my-ubuntu
root@1a256f34b88f:/# ifconfig
bash: ifconfig: command not found
root@1a256f34b88f:/#

終了してもコンテナ自体は残っている。そこで、残っているコンテナを廃棄して、再度起動して ifconfig を実行すると、エラーになる。つまり、前回イメージを起動した状態と同じ状態になっている。

~/docker/ubuntu$ docker run -it my-ubuntu
root@1a256f34b88f:/# ifconfig
bash: ifconfig: command not found
root@1a256f34b88f:/# apt-get -q install -y net-tools
(中略)
root@1a256f34b88f:/# ifconfig
eth0: flags=4163<UP,BROADCAST,RUNNING,MULTICAST>  mtu 1500
        inet 172.17.0.2  netmask 255.255.0.0  broadcast 172.17.255.255
        ether 02:42:ac:11:00:02  txqueuelen 0  (Ethernet)
        RX packets 136  bytes 207667 (207.6 KB)
        RX errors 0  dropped 0  overruns 0  frame 0
        TX packets 82  bytes 5554 (5.5 KB)
        TX errors 0  dropped 0 overruns 0  carrier 0  collisions 0
(中略)
root@1a256f34b88f:/# exit
exit
~/docker/ubuntu$ docker ps -a
CONTAINER ID        IMAGE               COMMAND             CREATED             STATUS                      PORTS               NAMES
1a256f34b88f        my-ubuntu           "/bin/bash"         3 minutes ago       Exited (0) 38 seconds ago                       hungry_shamir

再度イメージを起動して net-tools をインストールして終了、コンテナIDを確認。

~/docker/ubuntu$ docker commit 1a256f34b88f my-ubuntu
sha256:e2b7322de666afa9b87c841b7641fd558673d1739b00025f1a8591f437b380a0
~/docker/ubuntu$ docker rm 1a256f34b88f 
1a256f34b88f

コミットしてコンテナを廃棄。

~/docker/ubuntu$ docker run -it my-ubuntu
root@34e51c7d376d:/# ifconfig
eth0: flags=4163<UP,BROADCAST,RUNNING,MULTICAST>  mtu 1500
        inet 172.17.0.2  netmask 255.255.0.0  broadcast 172.17.255.255
        ether 02:42:ac:11:00:02  txqueuelen 0  (Ethernet)
        RX packets 18  bytes 2406 (2.4 KB)
        RX errors 0  dropped 0  overruns 0  frame 0
        TX packets 0  bytes 0 (0.0 B)
        TX errors 0  dropped 0 overruns 0  carrier 0  collisions 0
(中略)
root@34e51c7d376d:/# history
    1  ifconfig
    2  apt-get -q install -y net-tools
    3  ifconfig
    4  exit
    5  ifconfig
    6  history
root@34e51c7d376d:/# 

イメージを起動すると、今度は net-tools がインストールされた状態で起動される。historyも残っている。

つまり、以下のような感じで作業していけばよさそう。

  • 失敗したら終了してコンテナ廃棄。再度イメージを起動してコンテナ生成して再トライ。
  • うまく行ったら、節目節目でコミット。
  • 手順がはっきりしたら、history で作業手順確認してDockerfileに記述、イメージ生成してうまく行っているか確認。

Docker CEをインストール

LinuxMint19にDocker CEをインストールしてみます。

Ubuntuへのインストール方法を書いていただいている方がたくさんあるのであまりハマりどころはないのですが、注意点はリポジトリの設定のところです。

まず、レポジトリ設定の前の部分まで。

$ sudo apt-get update
$ sudo apt-get install -y apt-transport-https ca-certificates curl software-properties-common
$ curl -fsSL https://download.docker.com/linux/ubuntu/gpg | sudo apt-key add -
$ sudo apt-key fingerprint 0EBFCD88
pub   rsa4096 2017-02-22 [SCEA]
      9DC8 5822 9FC7 DD38 854A  E2D8 8D81 803C 0EBF CD88
uid           [  不明  ] Docker Release (CE deb) <docker@docker.com>
sub   rsa4096 2017-02-22 [S]

リポジトリの設定のところはUbuntuと同じ方法のままでは後でエラーになります。このためUbuntuの場合と異なる作業になります。

$ sudo add-apt-repository "deb [arch=amd64] https://download.docker.com/linux/ubuntu bionic stable"

[2019/9/16追記]
LinuxMint 19.2 LTSではエラーになるようです。/etc/apt/sources.list.d/additional-repositories.list に以下の内容を記述して対応できるようです。

deb [arch=amd64] https://download.docker.com/linux/ubuntu bionic stable

[2022/05/26追記]
LinuxMint20 の場合は、

$ sudo add-apt-repository "deb [arch=amd64] https://download.docker.com/linux/ubuntu focal stable"

となります。

あとはUbuntuと同じ作業です。

$ sudo apt-get update
$ sudo apt-get install -y docker-ce docker-ce-cli containerd.io
$ docker version
Client:
 Version:           18.09.5
 API version:       1.39
 Go version:        go1.10.8
 Git commit:        e8ff056
 Built:             Thu Apr 11 04:43:57 2019
 OS/Arch:           linux/amd64
 Experimental:      false
Got permission denied while trying to connect to the Docker daemon socket at unix:///var/run/docker.sock: Get http://%2Fvar%2Frun%2Fdocker.sock/v1.39/version: dial unix /var/run/docker.sock: connect: permission denied
$ sudo usermod -aG docker ${USER}

最後のは一般ユーザーでdockerを実行するために必要なグループ設定です。一旦ログアウトしてログインし直します。

$ docker version
Client:
 Version:           18.09.5
 API version:       1.39
 Go version:        go1.10.8
 Git commit:        e8ff056
 Built:             Thu Apr 11 04:43:57 2019
 OS/Arch:           linux/amd64
 Experimental:      false

Server: Docker Engine - Community
 Engine:
  Version:          18.09.5
  API version:      1.39 (minimum version 1.12)
  Go version:       go1.10.8
  Git commit:       e8ff056
  Built:            Thu Apr 11 04:10:53 2019
  OS/Arch:          linux/amd64
  Experimental:     false

こちらの記事を参考にさせていただき、hello-word コンテナで試してみました。

~$ mkdir docker
~$ cd docker/
~/docker$ ls -la
合計 8
drwxrwxr-x  2 xxx xxx 4096  4月 20 03:23 .
drwxr-xr-x 44 xxx xxx 4096  4月 20 03:23 ..
~/docker$ docker run hello-world
Unable to find image 'hello-world:latest' locally
latest: Pulling from library/hello-world
1b930d010525: Pull complete 
Digest: sha256:92695bc579f31df7a63da6922075d0666e565ceccad16b59c3374d2cf4e8e50e
Status: Downloaded newer image for hello-world:latest

Hello from Docker!
This message shows that your installation appears to be working correctly.

To generate this message, Docker took the following steps:
 1. The Docker client contacted the Docker daemon.
 2. The Docker daemon pulled the "hello-world" image from the Docker Hub.
    (amd64)
 3. The Docker daemon created a new container from that image which runs the
    executable that produces the output you are currently reading.
 4. The Docker daemon streamed that output to the Docker client, which sent it
    to your terminal.

To try something more ambitious, you can run an Ubuntu container with:
 $ docker run -it ubuntu bash

Share images, automate workflows, and more with a free Docker ID:
 https://hub.docker.com/

For more examples and ideas, visit:
 https://docs.docker.com/get-started/

~/docker$ docker images
REPOSITORY          TAG                 IMAGE ID            CREATED             SIZE
hello-world         latest              fce289e99eb9        3 months ago        1.84kB
~/docker$ docker ps
CONTAINER ID        IMAGE               COMMAND             CREATED             STATUS              PORTS               NAMES
~/docker$ docker ps -a
CONTAINER ID        IMAGE               COMMAND             CREATED              STATUS                          PORTS               NAMES
b92f58de7250        hello-world         "/hello"            About a minute ago   Exited (0) About a minute ago                       suspicious_tesla
~/docker$ docker ps -a
CONTAINER ID        IMAGE               COMMAND             CREATED             STATUS                     PORTS               NAMES
b92f58de7250        hello-world         "/hello"            2 minutes ago       Exited (0) 2 minutes ago                       suspicious_tesla
~/docker$ docker rm b92f58de7250
b92f58de7250
~/docker$ docker rmi hello-world
Untagged: hello-world:latest
Untagged: hello-world@sha256:92695bc579f31df7a63da6922075d0666e565ceccad16b59c3374d2cf4e8e50e
Deleted: sha256:fce289e99eb9bca977dae136fbe2a82b6b7d4c372474c9235adc1741675f587e
Deleted: sha256:af0b15c8625bb1938f1d7b17081031f649fd14e6b233688eea3c5483994a66a3
~/docker$